June 29, 2008

Daring Bakers: Danish Braid (finally!)

Kelly of Sass & Veracity and Ben of What's cooking? chose this month's Daring Bakers recipe.

I just love how things worked out for me this month. I learned to make croissants last weekend, and this dough is also a laminated dough (one which is layered with butter, then folded and rolled out several times). So, I felt confident to try this at home.

I made a whole batch of dough, but used half to make croissants for breakfast. The other half became the danish braid, which I filled with fresh sour cherries that I bought at the farmers market yesterday.

Photobucket

DANISH BRAID

Makes enough for 2 large braids

Ingredients
1 recipe Danish Dough (see below)
2 cups fruit filling, jam or preserves (see below)
For the egg wash: 1 large egg, plus 1 large egg yolk
  • Line a baking sheet with a silicone mat or parchment paper. On a lightly floured surface, roll the Danish Dough into a 15 x 20-inch rectangle, ¼ inch thick. If the dough seems elastic and shrinks back when rolled, let it rest for a few minutes, then roll again. Place the dough on the baking sheet.
  • Along one long side of the pastry make parallel, 5-inch-long cuts with a knife or rolling pastry wheel, each about 1 inch apart. Repeat on the opposite side, making sure to line up the cuts with those you’ve already made.
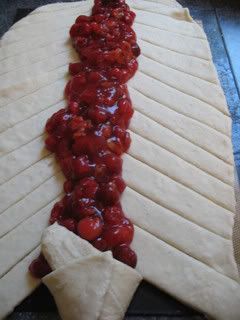
  • Spoon the filling you’ve chosen to fill your braid down the center of the rectangle. Starting with the top and bottom “flaps”, fold the top flap down over the filling to cover. Next, fold the bottom “flap” up to cover filling. This helps keep the braid neat and helps to hold in the filling. Now begin folding the cut side strips of dough over the filling, alternating first left, then right, left, right, until finished. Trim any excess dough and tuck in the ends.
Photobucket
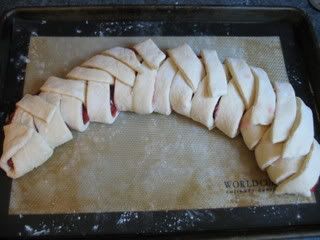
I didn't really pay close attention to the size and number of "flaps" I cut on the braid, and so it was thicker on one end.
  • For the Egg Wash: Whisk together the whole egg and yolk in a bowl and with a pastry brush, lightly coat the braid.
Proofing and Baking
  • Spray cooking oil (Pam…) onto a piece of plastic wrap, and place over the braid. Proof at room temperature or, if possible, in a controlled 90 degree F environment for about 2 hours, or until doubled in volume and light to the touch.
Photobucket
I rolled the dough a bit too big for my pan, so I had to curve the braid.
  • Near the end of proofing, preheat oven to 400 degrees F. Position a rack in the center of the oven.
  • Bake for 10 minutes, then rotate the pan so that the side of the braid previously in the back of the oven is now in the front. Lower the oven temperature to 350 degrees F, and bake about 15-20 minutes more, or until golden brown.
Photobucket
My braid came undone a bit during baking, but it was still delish!
  • Cool and serve the braid either still warm from the oven or at room temperature. The cooled braid can be wrapped airtight and stored in the refrigerator for up to 2 days, or freeze for 1 month.

DANISH DOUGH


Makes 2-1/2 pounds dough (enough for two braids)

Ingredients

For the dough:

1 ounce fresh yeast or 1 tablespoon active dry yeast
1/2 cup whole milk
1/3 cup sugar
Zest of 1 orange, finely grated
3/4 teaspoon ground cardamom
1-1/2 teaspoons vanilla extract
1/2 vanilla bean, split and scraped
2 large eggs, chilled
1/4 cup fresh orange juice
3-1/4 cups all-purpose flour
1 teaspoon salt

For the butter block:
1/2 pound (2 sticks) cold unsalted butter
1/4 cup all-purpose flour

Dough
  • Combine yeast and milk in the bowl of a mixer fitted with the paddle attachment and mix on low speed. Slowly add sugar, orange zest, cardamom, vanilla extract, vanilla seeds, eggs, and orange juice. Mix well. Change to the dough hook and add the salt with the flour, 1 cup at a time, increasing speed to medium as the flour is incorporated. Knead the dough for about 5 minutes, or until smooth. You may need to add a little more flour if it is sticky. Transfer dough to a lightly floured baking sheet and cover with plastic wrap. Refrigerate for 30 minutes.
  • Without a standing mixer: Combine yeast and milk in a bowl with a hand mixer on low speed or a whisk. Add sugar, orange zest, cardamom, vanilla extract, vanilla seeds, eggs, and orange juice and mix well. Sift flour and salt on your working surface and make a fountain. Make sure that the “walls” of your fountain are thick and even. Pour the liquid in the middle of the fountain. With your fingertips, mix the liquid and the flour starting from the middle of the fountain, slowly working towards the edges. When the ingredients have been incorporated start kneading the dough with the heel of your hands until it becomes smooth and easy to work with, around 5 to 7 minutes. You might need to add more flour if the dough is sticky.
Butter Block
  • Combine butter and flour in the bowl of a mixer fitted with a paddle attachment and beat on medium speed for 1 minute. Scrape down the sides of the bowl and the paddle and then beat for 1 minute more, or until smooth and lump free. Set aside at room temperature.
  • After the detrempe has chilled 30 minutes, turn it out onto a lightly floured surface. Roll the dough into a rectangle approximately 18 x 13 inches and ¼ inch thick. The dough may be sticky, so keep dusting it lightly with flour. Spread the butter evenly over the center and right thirds of the dough. Fold the left edge of the detrempe to the right, covering half of the butter. Fold the right third of the rectangle over the center third. The first turn has now been completed. Mark the dough by poking it with your finger to keep track of your turns, or use a sticky and keep a tally. Place the dough on a baking sheet, wrap it in plastic wrap, and refrigerate for 30 minutes.
  • Place the dough lengthwise on a floured work surface. The open ends should be to your right and left. Roll the dough into another approximately 13 x 18 inch, ¼-inch-thick rectangle. Again, fold the left third of the rectangle over the center third and the right third over the center third. No additional butter will be added as it is already in the dough. The second turn has now been completed. Refrigerate the dough for 30 minutes.
  • Roll out, turn, and refrigerate the dough two more times, for a total of four single turns. Make sure you are keeping track of your turns. Refrigerate the dough after the final turn for at least 5 hours or overnight. The Danish dough is now ready to be used. If you will not be using the dough within 24 hours, freeze it. To do this, roll the dough out to about 1 inch in thickness, wrap tightly in plastic wrap, and freeze. Defrost the dough slowly in the refrigerator for easiest handling. Danish dough will keep in the freezer for up to 1 month.
SOUR CHERRY FILLING

Photobucket
I have so many cherries! Look for more recipes here soon!

Makes enough for two braids

Ingredients
2 pounds of fresh sour cherries, pitted
1/2 cup sugar
1 tsp. ground cinnamon
2 tablespoons corn starch
1/2 cup water (or more if needed)

Photobucket
Ripe cherries are easy to pit by gently squeezing them.

Toss all ingredients in a small saucepan. Bring to a boil over medium heat, then lower heat and simmer 2 minutes or until thickened. Thin with a bit more water if needed. Transfer to a bowl and let cool to room temperature.

Photobucket
I also topped each piece of the braid with a thin glaze of powdered sugar and milk.

Teaching My First Cooking Class

I taught my first cooking class at Kitchen Conservatory last Sunday. Anne had called me on the Thursday before to ask if I'd teach her novel cuisine class so that she could attend a funeral. I wanted to scream "yes" instantly, but I was nervous because not only had I not read the book...I also had never made or eaten or even seen the main dishes she chose: Goan Style Shrimp (recipe below) and Nasi Goreng.

The novel cuisine classes are book club/demonstration cooking classes. This month's reading was Michael Krondl's The Taste of Conquest: The Rise and Fall of the Three Great Cities of Spice. According to Amazon.com, Krondl is "a noted chef turned writer and food historian" who "tells the story of three legendary cities--Venice, Lisbon, and Amsterdam--and how their single-minded pursuit of spice helped to make (and remake) the Western diet and set in motion the first great wave of globalization. "

Anne's menu featured three recipes inspired by those three cities. The Goan Style Shrimp is similar to a curry (at least, I thought it was) and my favorite dish. I liked it so much that I made it at home for dinner last night. Nasi Goreng, a spicy Indonesian rice dish that "recalls the Golden Age of the Dutch East India Company," is a tradition in Dutch households. Referred to as Indonesian Rice Table, it's served with several bowls of garnishes like roasted peanuts or cashews, toasted coconut, golden raisins, bananas, and mango chutney. Our meal concluded with Triple Ginger Bread & freshly whipped cream (by hand, because that's how I roll).

Even though I was nervous at the start of class, I quickly eased into the cooking. And, the participants (mostly regulars who come to this class each month) were very patient and kind and complimentary. They kept the book discussion going and weren't upset when the cake stuck to the pan a bit. And, they nicely ignored what a messy cook I am.

I am looking forward to teaching a few more classes in the fall. I'm scheduled to teach a series called "Cookin' the Books." Each class will feature recipes from a particular cookbook:

Sept. 14 (12:30-3:00) - The Bacon Cookbook
* Hot bacon-blue cheese dip
* Corn & bacon souffle
* Chicken, avocado, & orange salad with bacon dressing
* German bacon cookies with maple glaze


Oct. 12 (1:00-3:30) - The Kitchen Diaries
* Goat cheese "puddings"
* Red lentil & pumpkin soup
* Rosemary & pancetta chicken patties stuffed with gorgonzola
* "Very good chocolate brownies"


Nov. 2 (1:00-3:30) - Tyler's Ultimate
* Caramelized onion toast
* Curry-lime chicken wings
* Macaroni & cheese with peas & bacon
* Pear cobbler with cranberry streusel


If you're interested in taking a class, you can call Kitchen Conservatory at 314-862-2665 or register online. The fall schedule should be available in August.

And now...
Goan Style Shrimp


2 pounds shrimp, peeled & deveined
2 tablespoons fresh ginger, roughly chopped
8 garlic cloves, peeled
1/2 cup water
4 tablespoons vegetable oil
1 medium yellow onion, chopped
3 (or more) fresh hot green chili peppers, seeded & minced
1 teaspoon Thai chili paste (sambal oelek), or more to taste
1/2 teaspoon ground turmeric
2 teaspoons ground cumin
1/2 teaspoon salt
1 cup coconut milk, well-stirred
freshly chopped cilantro or parsley, for garnish (optional)
  • Combine the ginger & garlic with the water in a blender or food processor and puree until smooth.
  • Heat the oil in a saute pan and cook the onions until translucent, about 10 minutes.
  • Add the ginger-garlic paste, chili, chili paste, turmeric, & cumin and cook for a minute. Taste for seasoning. Add more chili paste if you want it hotter.
  • Add the coconut milk and salt. Bring to a boil.
  • Toss in shrimp and cook a minute or two, just until the shrimp are pink.
  • Serve over rice. Sprinkle with fresh herbs (and a squirt of fresh lime juice), if desired.

June 26, 2008

Rhubarb Ice Cream

In his book The Perfect Scoop, David Lebovitz explains the difference between French-style and Philadelphia-style ice creams. French-style ice creams are custard-based, made by mixing heated milk, sugar, and cream with egg yolks. They are richer and smoother than Philadelphia-style ice creams, which are made by simply mixing milk or cream with sugar and other ingredients (typically fruit).

The first ice cream I made was custard-based, and I wanted to try the other style...and I needed to rescue the rhubard that had been dying in my fridge for a few weeks. So, rhubarb ice cream it was!

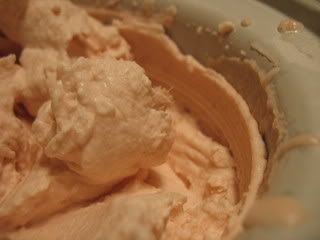
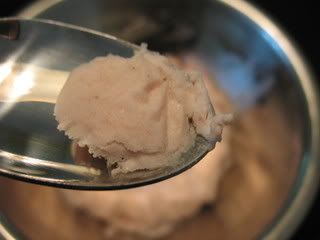
Philadelphia-style ice cream is lighter and fluffier than custard creams, and the fruit flavor came forward nicely without all the richness of egg yolks.

This was so good, in fact, that I made two batches! The second one was devoured at camp this morning.

Photobucket

Rhubarb Ice Cream

4 stalks rhubarb, about 1 1/4 lbs
1 cup water
3/4 cup sugar
1 cup heavy cream
1 teaspoon vanilla extract
  • Trim the ends & peel the rhubarb stalks, then chop them into 1/2″ pieces.
  • Place the pieces in a saucepan with the sugar & water and boil on high heat for about 10-15 minutes, or until the fruit is broken down.
  • Remove the rhubarb & its liquid from the saucepan and puree in a food processor until smooth. Strain if needed (taste to see if it's stringy). Place the pureed rhubarb in the refrigerator to cool for at least 2 hours.
  • Add the cream and vanilla to the rhubarb puree & churn in ice cream maker according to manufacturer's directions.

Photobucket

June 25, 2008

Chocolate & Banana Chip Cookies

For the past seven years, I've been teaching the summer writing camp at the university where I work. It's a 2-week creative writing workshop for kids in grades 3-12. I usually teach the middle school and high school groups. It's a fairly easy gig overall (I sit in a computer lab all day while the groups are busy writing), and the kids--most of whom come to camp summer after summer--are usually pretty creative and fun.

Yesterday, I helped out in recreation while someone else supervised my groups during writing. I had to entertain all of the writing campers while groups of 5 or 6 climbed on the rock wall. I was not prepared to play physical games all day and had to come up with things to do off the top of my head. In the morning, we did some yoga. It was pretty cool that they actually followed along. At the end of the routine, I had them all laying flat on their backs, concentrating on their breathing, in deep relaxation. It was great.

The afternoon, however, was stressful. We played duck-duck-goose, tag, tug-of-war, and dodgeball...aka the game that brings out the worst in people. Even though we were playing with cushy Nerf balls, kids were crying when they got hit. And, they were crying when they didn't get their way. And crying when they supposedly got hurt. I had to get a couple ice packs for stubbed toes and stepped-on-feet.

It was exhausting. So much, in fact, that I actually took a nap when I got home. And today my muscles are sore. My arms and legs ache. I now completely appreciate what the rec teachers do every day. And, I never want to do it again.

Anyway...

Rachel, a friend and colleague of mine, has been not-so-subtly hinting around that she wanted me to bring cookies to camp. So, these treats were for her.

Chocolate & Banana Chip Cookies
Adapted from 101 Cookbooks

Photobucket

2 1/4 cups whole wheat flour
1/2 teaspoon baking soda
1/2 teaspoon baking powder
1/2 teaspoon kosher salt
3/4 cup (1 1/2 sticks) unsalted butter
1 cup light brown sugar
3 large eggs
2 teaspoons vanilla extract
2/3 cup banana chips, roughly chopped
1 cup mini chocolate chips
2/3 cup toasted walnuts, chopped

  • Preheat oven to 375 degrees. Line a baking sheet with a silicone baking mat or with parchment paper.
  • Whisk together the flour, baking soda, baking powder, and salt. Set aside.
  • In a large bowl, or stand mixer, beat the butter until lightly and fluffy, then beat in the sugar until it is the consistency of a thick frosting. Beat in the eggs one at a time, incorporating each fully before adding the next, and scraping down the sides of the bowl a few times along the way. Stir in the vanilla. Add the flour mixture in two increments, mixing a bit between each addition. Stir in the banana chips, chocolate chips & walnuts, mixing just until everything is evenly distributed.
  • Drop 1 heaping tablespoon of dough for each cookie onto the prepared baking sheet 2 inches apart. Bake for about 8 minutes, until barely golden on top and bottom. Resist over baking, as they will come out dry and not as tasty. Transfer to a cooling rack.
Make 3 dozen cookies.

Photobucket

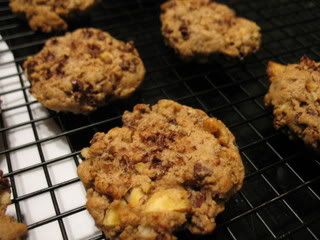
A few notes: I originally tweaked Heidi's recipe just a bit, using whole wheat flour instead of whole wheat pastry flour and wheat germ. The batter was pretty dry, and the cookies didn't spread at all. So, after baking a dozen, I added more butter and another egg to the batter. The cookies then spread a little more and were moister. That's the recipe I've posted above.

June 23, 2008

Learning to Make Croissants (with video!)

When Anne, our fearless leader at Kitchen Conservatory, offered to teach the staff how to make croissants, I jumped at the chance. I mean, when else would I be able to learn first hand how to make those flaky, buttery morsels? Here's the recipe, with my notes and pics added:

Croissants
1 cup milk
1 cup water
7 tablespoons sugar
1 tablespoon + 2 teaspoons instant yeast (we used bread machine yeast)
2 teaspoons salt
5 1/3 cups all-purpose flour (approximately)
1 pound unsalted butter, cold

  • Put the yeast & sugar into the bowl of a stand mixer. Warm the milk & water to 110 degrees (bath-water temp) and pour into the bowl with the yeast. Cover with a towel. When a foam appears, add the salt.

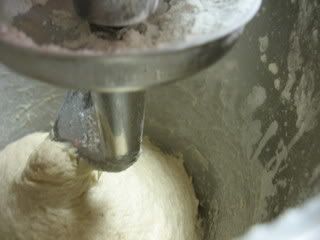
  • With the dough hook attachment of a stand mixer running, add the flour to the bowl a little bit at a time, until smooth & no longer sticky. The dough should pull away from the bowl.
Photobucket

  • Then, let the dough rest in the refrigerator for at least an hour (overnight is okay, too).

  • With a rolling pin, smash the cold butter between layers of plastic wrap. Like this:

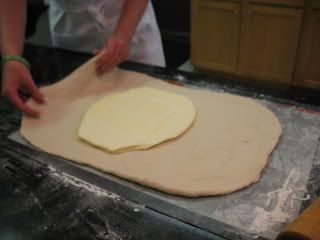
  • Roll out the chilled dough and put the butter into the middle.
Photobucket

  • Fold the dough over and seal very tightly (you don't want the butter oozing out!) with no air bubbles. Roll out the dough and fold into thirds. Then roll out the dough in the other direction and fold into fourths ("bookfold"). Roll out again (always roll the opposite way you folded!) and fold into thirds. Refridgerate the dough overnight.
Photobucket
All of the folding & rolling creates layers of butter and dough. This is called "laminating" the dough. It's what makes croissants butter & flaky!

  • To finalize the rolling process, roll out the dough and fold into fourths. Then, roll out the dough to a quarter-inch thick. Cut in half and chill one half while working with the other.
Photobucket
NOTE: When you are working with the dough, if it starts to feel too warm or the butter starts to ooze, put it back in the fridge to chill. Also, if it get sticky, sprinkle flour while rolling. You can brush off excess flour with a pastry brush.

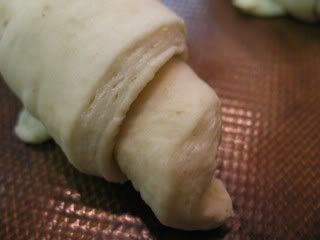
  • Cut into triangles and tightly roll into crescents:
Photobucket

  • Place on a lined baking sheet, brush with egg wash (1 yolk with 1 tablespoon water). Let rise for about 10-15 minutes. Brush with the egg wash again and bake at 375 until well-browned, about 15 minutes. You want the finished croissants to be very browned; this helps to ensure that the inside is flaky and not doughy.
Photobucket
Photobucket
Photobucket

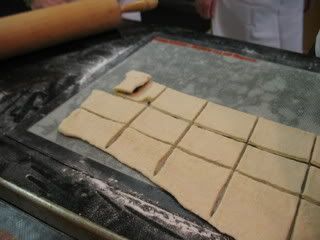
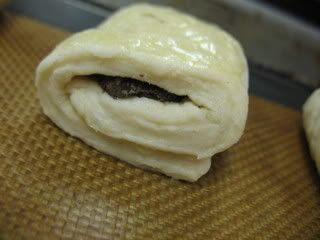
  • You can also cut the dough into rectangles and fill them with a few pieces of chocolate.
Photobucket
Photobucket
Thanks, Anne, for teaching us all how to make these wonderful treats!

Grand Opening at The Stable

Photobucket

I was surprised at how crowded it was Saturday night for the grand opening of The Stable. It was literally PACKED, even with the patio open.

The beers were flowing; in fact, three kegs tapped out while I was there.

Photobucket

Disclaimer: Forgive the not-so-good pics. It was dark and I was trying to take quick pics without being conspicuous.

I ate the charcuterie & cheese plates, bacon-wrapped dates, fava bean & artichoke brulee, and a steak grinder. While everything was good, the dates were by far the best thing I tried.

Photobucket
The dates were smoky & sweet...so good!

The charcuterie plate was also very good, something I'll order again for sure. It featured a selection of sausages and cured meats like proscuitto & coppa served with banana peppers, bread, and a mustard ale sauce.

Photobucket
I should have taken a pic when the meat & cheese plates first arrived, but everyone started in as soon as they were set down.

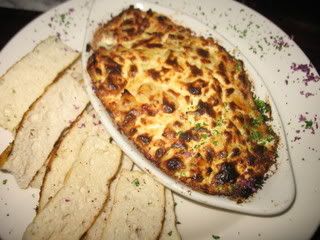
The brulee is a creamy baked dip, a sort of more sophisticated version of the standard artichoke dip (though it needs to be served with more bread, since it's such a generous portion of dip).

Photobucket

The grinder was made up of tender, marinated, grilled steak topped with mozzarella. Nothing too fancy, but tasty. It hit the spot after a few brews.

Next time, I'll try the Sicilian Gumbo (with salsiccia, shrimp, fava beans, roasted red peppers, & ground veal topped with risotto), pizza (so many of them sound so good!), butternut squash ravioli (with white bean ragout & age butter), and one of the dinner specials like "slow cooked pork Osso Buco with gorgonzola and cheddar macaroni" (available on Thursdays).

Photobucket

June 19, 2008

CORRECTION: The Stable is OPEN!

*UPDATE: They are actually open to the public tonight and tomorrow night. Bar opens at 4, kitchen starts at 6. The grand opening is set for Saturday.

I've written before about The Stable, a new microbrewery/distillery/eatzzeria that's opening in south St. Louis. My friends Sara & Jesse are the owners. This bar is getting LOTS of press around here. In fact, there was a blurb about them in The St. Louis Business Journal yesterday, they were discussed on Fox Channel 2 this morning, and were mentioned on NPR as well.

Why all the hype about a bar opening?

Besides producing two of its own microbrews on site, The Stable will be serving a selection of hard to find beers on tap and in bottles. No Bud Light or Miller Lite here! This place is for serious beer drinkers. You can see the current beer list on STLHops.

The Stable will also brew Lemp's Cherokee Lager, a Vienna-style red lager, under contract with Steve DeBellis, owner of the Lemp Brewing Co. name and trademark. This will mark the first time Lemp has been brewed in St. Louis since the end of Prohibition. Plus, The Stable is the St. Louis area's first microdistillery; they will be crafting small batches of spirits including rum, vodka, absinthe, and moonshine.

And, the food is excellent. I've had a chance to sample some of the appetizers and pizzas. They will also offer a house salad, grinder sandwiches, entrees (apparently, the steak and truffled mashed potatoes are tasty), and daily specials. I have my eye on the Thursday special: Osso Bucco with macaroni & cheese. (I'll write more about the food this weekend, as I'm having dinner there on Saturday.)

The Stable is located at the corner of Lemp & Cherokee. Join us on Saturday evening for the Grand Opening!

June 17, 2008

Almost-Fudge Gâteau: A Tuesdays with Dorie Rewind

Ok, so, for this week's Tuesdays with Dorie post I was supposed to make the Peppermint Cream Puff Ring as chosen by Caroline of A Consuming Passion. But, I didn't want to make a peppermint cream puff ring. It's not that I don't like peppermint or cream or puff...it's just that most of the desserts I make sit around for a while before I can eat all of it. Or else I take pieces to my friends. And, I didn't think that a cream puff was something that would survive a few days.

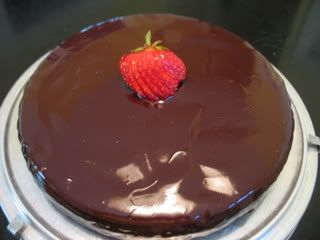
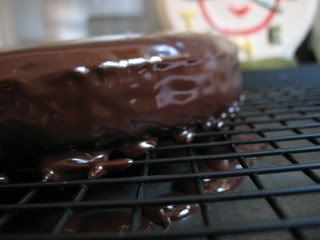
Instead, I made one of the previous TWD selections...Almost-Fudge Gâteau (chosen by Nikki of Crazy Delicious Food in February).


Photobucket

According to wiseGeek, "A gâteau (pronounced ga-toe) is a French cake, often specifically a sponge cake that may be made from almond flour instead of wheat flour. In general terms, any cake in France may be considered a gâteau, but some French cakes are more gâteau than cakes you might see in other parts of the world. Yet if you order any kind of cake in France, you will be ordering a gâteau."

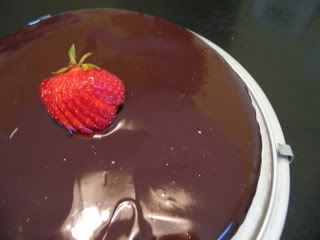
Dorie's recipe is a thick, one-layer chocolate cake with a ganache glaze. It reminds me of a flourless chocolate cake...only with flour. But, it's got that rich, thick, fudgey texture. So good. So easy. So pretty!
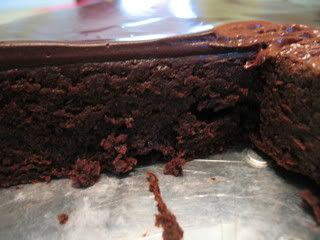

Photobucket

By the way, TWD'ers have been asked not to post the recipes anymore. That makes sense to me, since there are so many people now and eventually we'll bake everything in the book. BUT...since this is a previous recipe that's been posted by a bunch of people already, I decided to go ahead and include the full recipe here. (In the future, I'll link to each week's host as they are allowed to post the recipe.)


Almost-Fudge Gâteau

5 large eggs
9 ounces bittersweet chocolate, coarsely chopped
1 cup of sugar
5 tablespoons unsalted butter, cut into chunks
2 tablespoons coffee or water
1/3 cup all-purpose flour
Pinch of salt

For the Glaze
4 ounces bittersweet chocolate, coarsely chopped
½ cup heavy cream
2 teaspoons light corn syrup

Getting Ready:

Center a rack in the oven and preheat the oven to 350 degrees F. Butter a 9-inch springform pan, line the bottom with parchment paper, butter the paper, dust the inside of the pan with flour and tap out the excess. Place the pan on a baking sheet lined with parchment or a silicone mat.

Note: I only buttered & floured my pan...no parchment...and the cake just came right out when I turned it over after baking.

Separate the eggs, putting the whites in a mixer bowl or other large bowl and the yolks in a small bowl.

Set a heatproof bowl over a saucepan of simmering water and add the chocolate, sugar butter and coffee. Stir occasionally until the chocolate and butter are melted; the sugar may still be grainy, and that’s fine. Transfer the bowl to the counter and let the mixture sit for 3 minutes.

Using a rubber spatula, stir in the yolks one by one, then fold in the flour.

Working with the whisk attachment of the mixer or a hand mixer, beat the egg whites with the pinch of salt until they hold firm, but glossy peaks. Using the spatula, stir about one quarter of the beaten whites into the batter, then gently fold in the rest. Scrape the butter into the pan and jiggle the pan from side to side a couple of times to even the batter.

Bake for 35 to 45 minutes, or until the cake has risen evenly (it might rise around the edges and you’ll think it’s done, but give it a few minutes more, and the center will puff too) and the top has firmed (it will probably be cracked) and doesn’t shimmy when tapped; a thin knife inserted into the center should come out just slightly streaked with chocolate. Transfer the pan to a cooling rack and let the cake rest for 5 to 10 minutes.

Run a blunt knife gently around the edges of the cake and remove the sides of the pan. Carefully turn the cake over onto a rack and remove the pan bottom and the parchment paper. Invert the cake onto another rack and cool to room temperature right side up. As the cake cools, it may sink.

To Make the Glaze:

Photobucket

First, turn the cooled cake over onto another rack so you’ll be glazing the flat bottom, and place the rack over a baking sheet lined with parchment or wax paper to catch any drips.

Put the chocolate in a small heatproof bowl.

Melt the chocolate over a pan of simmering water or in a microwave oven – the chocolate should be just melted and only warm, not hot. Meanwhile, bring the cream to a boil in a small sauce pan. Pour the hot cream over the chocolate and stir very gently with a rubber spatula until the mixture is smooth and shiny. Stir in the corn syrup.

Pour the glaze over the cake and smooth the top with a long metal icing spatula. Don’t worry if the glaze drips unevenly down the sides of the cake – it will just add to its charms. Allow the glaze to set at room temperature or, if you’re impatient, slip the cake into the refrigerator for about 20 minutes. If the glaze dulls in the fridge, just give it a little gentle heat from a hairdryer.

Photobucket


June 15, 2008

Food Gawking

A Tastespotting clone has emerged...check out Food Gawker.

Cha, cha, changes

I'm playing around with my layout.

Please leave a comment and tell me what you think of my new look.

P.S. Any advice on how to upload a banner with a pic, please let me know. I've tried to use Blogger's uploading feature, but the pictures end up WAY too big.

Raw Beet Salad


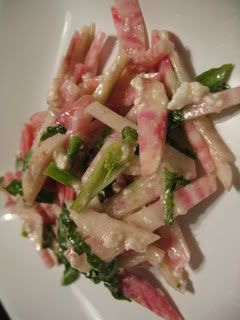
For dinner last night, I tried a raw beet salad, taking a cue from Clotilde Dusoulier and Mark Bittman,

Photobucket

Raw beets are crunchy and only slightly sweet. If you don't like pickled, boiled, or roasted beets, I suggest you try this. The raw flavor is different--fresher and not as sweet--than that of cooked beets...and raw beets really are beautiful.

Photobucket

Raw Beet Salad

5-6 small or medium beets
2 garlic scapes, sliced
1/4 cup feta cheese
4-5 basil leaves, chopped
1 tablespoon extra-virgin olive oil
1 tablespoon apple cider vinegar
1 teaspoon dijon mustard
salt & pepper
  • Make the dressing by whisking together the oil, vinegar, & mustard with a pinch of salt & pepper.
  • Trim, peel, and slice the beets into matchsticks.
Photobucket
  • Add the garlic scapes & feta.
  • Pour in the dressing and stir.
  • Add the basil & serve.
Photobucket

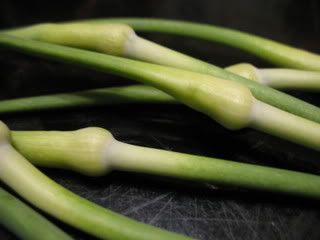
Garlic scapes, I've discovered, are basically the flowering stems of cultivated garlic. They can be eaten raw or cooked. They have a crunchy texture, like raw green beans, and taste fairly heavily of garlic...though not as strong as raw garlic cloves.

Photobucket

Most people add them to stir-fries, but you can also grill them, add to scrambled eggs, make into pesto, or add raw to salads. In this salad, they provided a nice spicy contrast to the slightly sweet beets.

If you don't have garlic scapes, you can substitute chives.

June 14, 2008

Tower Grove Farmers' Market

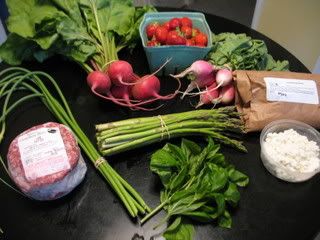
This morning was my first time at the Tower Grove Farmers' Market, and I loved it! There are only a dozen or so vendors, but they are all local.

Photobucket

I bought beets, radishes, and strawberries...

Photobucket

Oh, the strawberries. They are absolutely gorgeous...small and bright red. So fragrant and sweet. I'll probably just eat them all as they are.

Photobucket

...pencil-thin asparagus and basil...

Photobucket

The weather around here has just sucked for basil, too much rain. It's all turned yellow. This is hydroponic grown in Cape Girardeau, Missouri, at ShowMe Fresh Farm.

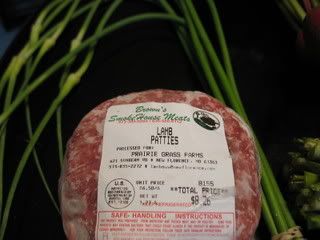
...lamb patties and garlic scapes...

Photobucket

Not quite sure what I'm going to do with the scapes, but they look very similar to the wild onions I picked in my front yard a few weeks ago. Are these the same things?

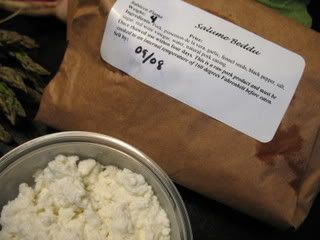
...goat's milk feta cheese and salsicca fiama.

Photobucket

Ok, this spicy Italian sausage is the whole reason I got up at 6:30 this morning to make it to the market when they opened. I was hoping that Mark Sanfilippo would have some salami at his new stand called Salume Beddu. However, he only had Italian sausage. That's okay; I'm sure these handmade sausages are fabulous. Plus, I got on his mailing list, and I'll be sure to head over there when the coppas and other cured meats are ready.