Showing posts with label dough. Show all posts

August 8, 2017

Grandma's Homemade Bread

One of my favorite memories of my Grandma Green, my dad's mother, is watching her cook. She fried chicken in Crisco in an electric skillet...she rolled steamed cabbage leaves around meatballs and stewed them in tomato sauce..she mixed cooked macaroni noodles with shredded cheddar cheese, milk, & lots of black pepper...she baked the best bread.

I can still picture her hands--tanned, thin skin...fingers crooked with arthritis--kneading the dough.

Homemade bread was a meal in itself...warm from the oven, slathered with salted butter...sometimes with homemade blackberry jam.

Last fall, as I was cleaning out my dad's house, I found this:


It's Grandma's bread recipe, written by my dad. Apparently, before Grandma died in 2011 (she was 96), my dad watched her make bread and wrote down what she did.

In April, I tried this recipe. Things seemed to be going well. The dough rose as it should, and the loaf looked pretty good out of the oven.


However, when I cut it I noticed that the bread was too tense in the middle. I should have let it rise longer in the loaf pan pre-baking OR I should have just dumped it into the pan without rolling it up. I think it would have retained some of its lightness that way.


Nevertheless, it was fun to try this family recipe...and to decipher what dad's notes meant. Perfecting Grandma's homemade bread is my goal for the fall...stay tuned!

June 8, 2016

Roasted Eggplant with Grilled Flatbread


Whenever I'm feeling down or need to feel inspired, I watch cooking shows like Parts Unknown (or anything with Anthony Bourdain), Chef's Table, Michael Pollan's Cooked (a new Netflix series), and my favorite The Mind of a Chef

While the newest season of Mind of a Chef (season 4) isn't yet available on Netflix, you can watch two episodes on the show's webpage.

In the first episode, New York chef Gabrielle Hamilton roasts eggplants over a gas burner just like you would roast a red bell pepper. When the eggplants are charred and meltingly tender, she mixes the smokey flesh with lemon, garlic, and olive oil. This simple spread is served with grilled flatbread. 

I've watched that episode three times now.

Disclaimer: I know this does not make the most appetizing-looking dish. I couldn't even get my boyfriend to taste it. But trust me when I say that it is quite delicious. Think unpureed, unadulterated baba ganoush. Please. Just trust me.

Incidentally, this is perfect at room temperature, so it's a great addition to summer picnics. Leftovers are good when mixed with cooked pasta and cheese or layered in a lasagna.

Trust me.

Smokey Eggplant
from Prune by Gabrielle Hamilton


August 21, 2014

Chicken & Dumplings


School started on Monday. I ended my summer break last week by binge watching season 2 of The Mind of a Chef. Sean Brock is just so damn adorable. And his southern comfort food is absolutely swoon-worthy.

One recipe that I knew I wanted to make as soon as possible was his mother's version of chicken & dumplings. Here's the clip:


All last week, I needed comfort food as I watched the world implode around me. The unrest in Ferguson, Missouri, hits close to home...literally. Ferguson is only 15 miles from my front door. So I decided there was no better way to start the school year and to relieve some of the tension of current events than by inviting friends over for chicken & dumplings and pie.

Here's my version of the Brocks' recipe:

Chicken & Dumplings

Note: This dish is much brothier when it's first made, more like a soup. The picture above was taken after the leftovers had been in the fridge for a couple of days, soaking up all the stock. Still delicious.

July 13, 2014

Salt Cod Fritters with Spicy Cilantro Sauce


Salt cod is cod fish that has been preserved by drying and salting. Before it can be used, salt cod must be either soaked in cold water for a few days, changing the water two to three times a day, or boiled to rehydrate and remove some of the salt.

It is most commonly used in brandade, a French gratin of mashed potatoes mixed with salt cod, garlic, and olive oil (which is smeared on bread and is heavenly); with ackee fruit in the national dish of Jamaica; in New England fish cakes; in a casserole with potatoes & onions; or battered & fried (as I did).

So, why use dried and salted fish when you could use fresh fillets? NPR compares salt cod to prosciutto, asking "Why eat prosciutto [...] when you could have fresh ham?"
This is not a gratuitous comparison. As Harold McGee writes in his encyclopedic work of food science, On Food and Cooking
The best of these [salted fish] are the piscatory equivalent of salt-cured hams. 
In both, salt buys time for transformation: it preserves them long and gently enough for enzymes of both fish and harmless salt-tolerant bacteria to break down flavorless proteins and fats into savory fragments, which then react further to create flavors of great complexity.
I made these fritters in a Girls' Night Out cooking class that I taught on Friday. Having never seen, used, or eaten salt cod before, most of the women in class were skeptical. However, this recipe was a hit!

Salt Cod Fritters


March 2, 2014

Lobster Rolls

When my friend Theresa came over last month to cook Coq au Riesling with me, we decided to make New England lobster rolls next time. I'd never eaten a real lobster roll, but we agreed that we had to make everything from scratch for it to be authentic--including cooking live lobsters, making mayonnaise for the salad, and baking fresh buns.

Lobster rolls are traditionally served on flat-sided buns that are buttered and toasted. According to the Boston Globe, "Variously called top-sliced, top-loading, or frankfurter roll, the style was developed sometime in the mid- to late ’40s, explains Michael Cornelis, vice president of American Pan, which makes baking pans for the industry. Howard Johnson’s approached J. J. Nissen bakery of Maine to develop a special bun for its fried clam strip sandwich. The restaurant chain wanted top sliced rolls that would stand upright and be easier to prepare, serve, and eat. […] 'Before the New England-style roll,' says Cornelis, 'there was no way to mechanically slice a bun part of the way through. If you wanted a roll pre-sliced, commercial bakers would slice them all the way through. Well, that’s not as happy a hot dog bun.'"

I borrowed Ruth's hot dog bun pan and followed the recipe on the King Arthur Flour website. In the end, they turned out just fine--albeit a little dense. Next time, I would buy good-quality buns (hubba) instead.

The lobster salad, however, was damn delicious. 

So, what do you think Theresa and I should cook next month?

Maine Lobster Rolls
recipe slightly adapted from Thomas Keller's Ad Hoc at Home


August 13, 2013

Artisan Bread in Five Minutes a Day

I recently came across a post by Zoe & Jeff, authors of Artisan Bread in Five Minutes a Day, featuring bread baked in a crock pot. "Genius," I thought. "No heating up the house to bake bread during the summer!"

Their basic white bread recipe makes four pounds of dough, enough for four loaves of bread. It's a simple technique: Simply mix the dough by hand and let it sit for 2 hours. At that time you can either bake a loaf or refrigerate the dough for a couple weeks, taking a pound out each time you want to bake some bread. It's stupid easy.

January 6, 2013

Quick & Easy French Baguettes

Browsing around on Foodgawker last week, I came across a recipe for "Quick and easy French bread, or the best thing ever." Since I do think that French bread is the best thing ever, I decided to give it a try (with a few small modifications)...my first attempt at baguettes. Just as the title states, the recipe is pretty dang easy; I had hot, crispy baguettes in just over an hour from start to finish.

This dough is simply mixed by hand and rises quickly. Two tools that I suggest are a non-stick, perforated baguette pan (for pretty, crispy loaves) and a Danish dough whisk (easier than a wooden spoon but won't get all gummed up with dough like a regular whisk).


Baking bread makes me so very happy...giddy, in fact. It was one of those "Look what I made!" moments. I just want to cuddle with these precious little loaves. Is that weird?

French Baguettes


makes 2 loaves

1 1/2 cups warm water
1 tablespoon sugar
1/2 tablespoon salt
1 1/2 tablespoons instant yeast (2 packages) *
3 cups all-purpose flour

*NOTE: Make sure to use "Rapid Rise" or instant yeast. If you use regular "Active Dry" yeast, your bread will be slighly doughy inside.
  • Mix the water, sugar, and salt in a large bowl. Sprinkle yeast on top & let sit 5 minutes. Stir.
  • Stir in 1 cup flour with a dough whisk or a wooden spoon, then mix in one cup more at a time until the dough no longer sticks to the sides of the bowl.  
  • Turn dough onto a well-floured surface (I like using a silicone pastry mat).  Coat hands (and the dough, if needed) with more flour to prevent any sticking & shape the dough into a log. Cut in half and gently roll each piece to form longer loaf shapes. 
  • Lay each loaf onto a non-stick baguette pan or a sheet pan lined with parchment or a silicone mat. Let rise in a warm place for 30 minutes. 
Pre-baked & unrisen: The dough is kind of craggily; don't be alarmed.
  • Meanwhile, preheat your oven to 400 degrees.
  • Spray the loaves with warm water (to create a crispy crust) & sprinkle with a tiny bit of kosher salt. 
  • Bake 20-30 minutes or until golden brown. Remove the pan from the oven & transfer the loaves to a cooling rack.

December 27, 2010

Homemade Biscuits

I first attempted homemade biscuits in junior high school.  We must have been given an assignment to make biscuits at home, because I remember pulling the hard, dense discs from the oven & my dad teasing me about how horrible they were.

That episode was so scarring that I didn't try to make biscuits again until last January. While those biscuits were crispy & buttery, they were still pretty dense. I wanted something flakier and fluffier.

Last week, I decided to finally try homemade biscuits again. I figured that since I've mastered pie crust and am more confident with doughs in general, biscuits would be no big deal. I was wrong. I rolled out the dough too thin (though, the recipe I was following said to roll it out to 1/4 inch thick), and the biscuits didn't really rise. They were flat and crispy, like biscuit cookies.

December 4, 2009

Momofuku Pork Belly Buns

A couple weeks ago, my friend Stephanie (aka Iron Stef) helped me make David Chang's roasted pork belly & Chinese steamed buns. The recipe comes from his new cookbook Momofuku, named after his acclaimed New York noodle bar (which was named after the guy who invented instant ramen).


Chang's book received attention when it was released in October not only because of the recipes and gorgeous color photos but also because of his narrative voice. In the introduction to each section, Chang "relays with candor the tale of his unwitting rise to superstardom, which, though wracked with mishaps, happened at light speed." And he curses. A lot.

On Oct. 27, the day Momofuku was published, Ian Froeb made some interesting observations in his Twitter updates (Ian is the food critic for The Riverfront Times & editor of their "Gut Check" blog):

# of paragraphs in Momofuku cookbook before first f-bomb? 7.5
in other words, having read only the intro, ready to declare Momofuku cookbook of the year. certainly the most entertaining.

The book does make for a good read. In fact, I read it cover-to-cover like a novel. Even the recipes themselves are entertaining reading. For example, in his steamed buns recipe he writes: "Cover the armada of little dough balls with a draping of plastic wrap and allow them to rest and rise for 30 minutes." Good stuff.

Warning: This cookbook is written for serious cooks. Chang even admits that some recipes aren't meant for home cooks. Other recipes, like his infamous pork belly buns, are fairly easy; they just require many time-consuming steps. But in the case of the pork belly buns, the time is totally worth it.


Pork Belly

One 3-pound slab skinless pork belly
1⁄4 cup kosher salt
1 ⁄4 cup sugar
  • Nestle the belly into a roasting pan or other oven-safe vessel that holds it snugly. Mix together the salt and sugar in a small bowl and rub the mix all over the meat; discard any excess salt-and-sugar mixture. Cover the container with plastic wrap and put it into the fridge for at least 6 hours, but no longer than 24.
  • Heat the oven to 450ºF.
  • Discard any liquid that accumulated in the container. Put the belly in the oven, fat side up, and cook for 1 hour, basting it with the rendered fat at the halfway point, until it’s an appetizing golden brown.
  • Turn the oven temperature down to 250ºF and cook for another 1 hour to 1 hour 15 minutes, until the belly is tender—it shouldn’t be falling apart, but it should have a down pillow–like yield to a firm finger poke. Remove the pan from the oven and transfer the belly to a plate. Decant the fat and the meat juices from the pan and reserve (see the headnote). Allow the belly to cool slightly.
  • When it’s cool enough to handle, wrap the belly in plastic wrap or aluminum foil and put it in the fridge until it’s thoroughly chilled and firm. (You can skip this step if you’re pressed for time, but the only way to get neat, nice-looking slices is to chill the belly thoroughly before slicing it.)
  • Cut the pork belly into 1⁄2-inch-thick slices that are about 2 inches long. Warm them for serving in a pan over medium heat, just for a minute or two, until they are jiggly soft and heated through. Use at once.

Steamed Buns
Makes about 50 buns

Okay, fifty buns is a lot of buns. But the buns keep in the freezer for months and
months without losing any quality, and if you cut the recipe down any more than this,
there’s barely enough stuff in the bowl of the mixer for the dough hook to pick up. So
clear out a couple of hours and some space in the freezer and get to work.

1 tablespoon plus 1 teaspoon active dry yeast
11⁄2 cups water, at room temperature
41⁄4 cups bread flour
6 tablespoons sugar
3 tablespoons nonfat dry milk powder
1 tablespoon kosher salt
Rounded 1⁄2 teaspoon baking powder
1/2 teaspoon baking soda
1 ⁄3 cup rendered pork fat or vegetable shortening, at room temperature
  • Combine the yeast and water in the bowl of a stand mixer outfitted with the dough hook. Add the flour, sugar, milk powder, salt, baking powder, baking soda, and fat and mix on the lowest speed possible, just above a stir, for 8 to 10 minutes. The dough should gather together into a neat, not-too-tacky ball on the hook. When it does, lightly oil a medium mixing bowl, put the dough in it, and cover the bowl with a dry kitchen towel. Put it in a turned-off oven with a pilot light or other warmish place and let rise until the dough doubles in bulk, about 1 hour 15 minutes.
  • Punch the dough down and turn it out onto a clean work surface. Using a bench scraper or a knife, divide the dough in half, then divide each half into 5 equal pieces. Gently roll the pieces into logs, then cut each log into 5 pieces, making 50 pieces total. They should be about the size of a Ping-Pong ball and weigh about 25 grams, or a smidge under an ounce. Roll each piece into a ball. Cover the armada of little dough balls with a draping of plastic wrap and allow them to rest and rise for 30 minutes.
  • Meanwhile, cut out fifty 4-inch squares of parchment paper. Coat a chopstick with whatever fat you’re working with.
  • Flatten one ball with the palm of your hand, then use a rolling pin to roll it out into a 4-inch-long oval. Lay the greased chopstick across the middle of the oval and fold the oval over onto itself to form the bun shape. Withdraw the chopstick, leaving the bun folded, and put the bun on a square of parchment paper. Stick it back under the plastic wrap (or a dry kitchen towel) and form the rest of the buns. Let the buns rest for 30 to 45 minutes: they will rise a little.
  • Set up a steamer on the stove. Working in batches so you don’t crowd the steamer, steam the buns on the parchment squares for 10 minutes. Remove the parchment. You can use the buns immediately (reheat them for a minute or so in the steamer if necessary) or allow to cool completely, then seal in plastic freezer bags and freeze for up to a few months. Reheat frozen buns in a stovetop steamer for 2 to 3 minutes, until puffy, soft, and warmed all the way through.


Quick Salt Pickles

Makes about 2 cups
(halve or double the recipe as needed)

2 meaty Kirby cucumbers, cut into 1⁄8-inch-thick disks.
1 tablespoon sugar
1 teaspoon kosher salt
  • Combine the cucumbers with the sugar and salt in a small mixing bowl and toss to coat with the sugar and salt. Let sit for 5 to 10 minutes.
  • Taste: if the pickles are too sweet or too salty, put them into a colander, rinse off the seasoning, and dry in a kitchen towel. Taste again and add more sugar or salt as needed.
  • Serve after 5 to 10 minutes, or refrigerate for up to 4 hours.
TO ASSEMBLE THE BUNS: Slather each bun with hoisin sauce. Then place a slice of pork belly, a couple pickles, & a sprinkling of sliced scallions inside the buns. Eat & be amazed that you made such a tasty dish. The next morning, take some buns from the freezer, steam them for just a couple minutes to reheat, then stuff each with scallion scrambled eggs & leftover pork belly that you've reheated in a skillet. Dress with hoisin sauce (or hot sauce if you're feeling frisky) for a breakfast of champions.

Thanks to Steph for taking the photos!


September 1, 2009

Grilled Fry Bread (and my panzanella recipe)

School has started again, which is why it’s been a while since my last post. People who aren’t teachers usually have no idea how time-consuming being a teacher really is. Between the lesson planning (always trying to come up with new & exciting projects, which students won't even do most of the time), reading & paper grading (the curse of an English teacher), there is little time for much else. Right now, I am teaching three different classes, including an American Studies class that is new to me. It’s a team-taught English & history class that we organized into themed units instead of chronological like usual.

Even though I’ve been busy with school for the past three weeks, we’ve still had some home-cooked meals...sausage & peppers with polenta, grilled London Broil, mustard chicken, panzanella. I’ve been making a lot of panzanella, my favorite summer recipe and a great way to use of overly ripe, late season tomatoes.

First, cube a baguette or other crusty loaf of bread (day-old works best but fresh is okay). Toss it with some olive oil, truffle salt, & pepper. Toast in a 350 degree oven until lightly browned & crunchy. Meanwhile, chop the tomatoes, add to a bowl & sprinkle with Kosher salt to let the juices flow. Add the toasted bread cubes & toss. Add diced mozzarella (or those tiny mozzarella pearls) & fresh basil (or chopped fresh rosemary). Taste. Add more salt & pepper if needed. If your tomatoes are particularly juicy, you may not need much else. If not, you can drizzle in some extra-virgin olive oil & a splash of red wine vinegar. I even like leftover panzanella the next day. If the bread is crispy (and old/dry) enough, it won’t get too soggy overnight. I even ate leftovers topped with a fried egg for breakfast.

I wanted to try a zucchini pasta recipe from the Chocolate & Zucchini cookbook last week, but I ended up making angel hair pasta with prosciutto & tomatoes in a rosemary cream sauce (an off-the-cuff kind of recipe) instead. I’ll get to that zucchini this week. I’m also thinking of making some moussaka with the farmers market eggplant I bought on Saturday.

I DID make one new recipe recently...grilled fry bread, from a Mexican grilling class I taught at Kitchen Conservatory.


Grilled Fry Bread

2 cups flour
2 tablespoons powdered milk
2 teaspoons baking powder
1 teaspoon kosher salt
2 tablespoons Crisco
2/3 cup hot water, or more if needed
2-3 tablespoons vegetable oil or melted butter


  • Place the flour, powdered milk, baking powder, & salt in a mixing bowl and whisk.
  • Add the shortening, cutting it in with a pastry blender. The mixture should be the texture of cornmeal.
  • Add enough hot water to obtain a soft, pliable dough.
  • Turn the dough onto a lightly floured work surface and knead for about 5 minutes. Wrap the dough in plastic wrap & let rest at room temperature for at least 30 minutes.
  • Divide the dough into 8 even pieces & roll each piece into a ball.
  • Working on a lightly floured surface, roll a ball into a thin disk 5-6 inches across. Place the disk on a floured baking sheet, then repeat with the remaining balls of dough. Keep the rolled-out dough covered with a damp cloth until your are ready to grill.
  • Heat a grill to high (or heat a grill pan on the stovetop). When ready to cook, brush oil onto the grate or pan. Brush the top of each disk with oil. Place a few disks, oiled side down, on the hot grill. Brush the other side with oil.
  • After 2-3 minutes, the bread will start to puff & blister and the bottom will become golden brown. Turn the bread over and grill the other side for 2-3 minutes longer.
  • Serve at once.
You can use this bread as a base for tacos (fill or top with meat, beans, & veggies), or you can sprinkle them with cheese to serve with a meal (add tomatoes for a meal). If you roll them out thin, you can crisp them on the grill until they are like crackers.


January 28, 2009

Biscuits are messy to make.

Monday night, I watched the sleet & snow fall and wondered if school would be canceled the next day. By 10:00, there was already a growing list of school closures.

"Do you have stuff to make biscuits in the morning?" Jerad asked.

"I guess so," I replied.

"Good. We can make biscuits & gravy for breakfast, since you won't have school."

By the time I went to bed, my school still wasn't added to the list of closed schools. At 5:15 the next morning, while every other school in the area was listed, mine still wasn't on there. About 15 minutes later, I got the call.

I answered the phone with a cheery "Good morning!" and promptly went back to bed.

* * *

I'd only made biscuits once before...in junior high foods class. And, they were awful...flat, hard, & dry.

Despite making a huge mess in the kitchen (flour EVERYWHERE!) , these biscuits were easy to make. They were dense, crispy, & buttery and reminded us of pot pie crust...which was actually a nice contrast in texture with the sausage gravy we smothered them in. Next time, though, I'll try a different recipe...one that will yield a softer dough and give me big, fluffy biscuits.

Basic Biscuits

from Homesick Texan


According to Homesick Texan, "beaten biscuits are what people made in the days before baking soda and baking powder was around. In order to get the biscuits to rise, cooks would beat the dough with a mallet, rolling pin or even an axe for over half an hour until it blistered. This injection of air into the dough caused them to lift a bit, but beaten biscuits are still pretty flat, crispy and dense."

Ingredients:
Two cups of flour
1 tablespoon of baking powder
1 teaspoon of sugar (can add more to taste)
1/2 teaspoon of salt
1 stick of butter, cold (8 tablespoons)
3/4 cup of buttermilk, cream or half-and-half

Method:
  • Preheat the oven to 450 degrees.
  • Mix all the dry ingredients together.
  • Cut the stick of butter into pieces, and work into the flour mixture with your hands or a pastry blender until it resembles pea-sized crumbs.
  • Add the liquid, mixing until a bit loose and sticky.
  • Pour dough out on a floured surface, and knead for a minute. Dough should be smooth and no longer wet. You can sprinkle more flour on the surface if you find it’s sticking.
  • Take dough into a ball, and hit it with a rolling pin, turning it and folding it in half every few whacks. Do this for a couple of minutes.
  • Roll out dough until it’s 1/4 of an inch thick, and then fold it in half.
  • Using a round cutter (can use a glass or a cup if don’t have a biscuit cutter) cut out your biscuits from folded dough.
  • Place on a greased baking sheet close together (so they rise up not out), and bake for 15 minutes or until the tops are golden brown.
Makes 10-12 biscuits.

January 11, 2009

Homemade Honey Wheat Bread


I remember trying to make biscuits from scratch for homework in my junior high foods class. It was a disaster. The dough didn't rise, and the biscuits were hard as hockey pucks. My dad made fun of me for a while.

My Grandma Green used to make the best white bread...big, soft loaves that we'd eat warm with butter. My dad loved when Grandma would have a fresh loaf ready for us when we visited. My dad liked fresh bread so much that we'd even buy warm loaves at Silver Dollar City when we were on vacation and eat them with some blackberry jam we'd also purchased.

But, we never had fresh bread at home. My mom wasn't much of a baker, and my dad could only make pancakes and mayonnaise sandwiches.

Several years ago, I decided to make fresh bread and homemade jam for my dad for Christmas. The jam was good, but the bread was reminiscent of those biscuits...flat and dense. I tried a couple different recipes, but nothing turned out right.

That's why I was so excited to learn about the no-knead bread recipe last year...finally, a bread I couldn't screw up!

Tonight, however, I thought I'd try a traditional bread recipe again. I've mastered pie dough and pasta, so I was confident with mixing and kneading bread dough.

I was a little skeptical when I first kneaded the dough. It seemed hard, tough. It let it rise, thinking that it would never double...but after I moved the bowl to the radiator, it rose just fine.

I did notice that it didn't rise much more (if any) during baking, so I didn't get the big sandwich loaf I was hoping for. Nonetheless, it was pretty good!

Honey Wheat Bread


1 cup warm water
1 tablespoon half & half
2 tablespoons extra-virgin olive oil
2 tablespoons honey
1 teaspoon kosher salt
2 teaspoons instant active dry yeast (or 1 packet)
1 1/2 cups bread flour
1 1/2 cups whole wheat flour
olive oil for greasing bowl & pan
1 egg for egg wash
oats (optional)
  • Combine the first 5 ingredients into the bowl of a stand mixer & stir with a whisk.
  • Sprinkle the yeast on top of the wet ingredients, cover with a towel and let proof while you measure out the flour.
  • Add the flour to the yeast mixture & mix with a stand mixer fitted with dough hook just until the ingredients all come together to form a ball and now dry flour is left in the bottom.
  • Remove the dough from the bowl and knead by hand until it's smooth and elastic, about 10-15 minutes.
  • Please the dough in a greased bowl, turning to coat the dough. Cover with a towel and leave in a warm place to rise until doubled. (I set the bowl on top of the radiator.)
  • Punch the dough down, then knead for a few minutes until smooth. Form into a loaf and placed in a greased loaf pan. Let rise in a warm place until almost doubled in size.
  • Brush the top of the dough with the egg (mixed with a tablespoon of water) and sprinkle with some oats (if using).
  • Bake at 350 degrees for 30-35 minutes.
  • Remove from the oven and let cool in the pan for a few minutes. Remove the loaf and let cool on a wire rack.

November 16, 2008

Chorizo, Tomato, & Pine Nut Cake

I am verging on a cookbook addiction. It doesn't help, of course, that I work at a place which sells cookbooks. In an effort to curb my addiction, I've decided to start making recipes from the books I have before buying any more.

I bought Clotilde Dusoulier's Chocolate & Zucchini--a beautiful, fun book based on her blog--a while ago, but hadn't yet made any of the recipes. One, however, was always on my mind. The chorizo, tomato, & pistachio "cake" seemed the perfect thing to snack on with a glass of wine. So, when I was invited to a trivia contest last night, I decided to bake a loaf to take with me.

The original recipe calls for Spanich chorizo, a spicy dried sausage that's similar to pepperoni. I used Mexican chorizo, which is much easier to find, that I cooked in a skillet before adding to the batter.

And, since I can't seem to find shelled pistachios at any of my local grocery stores, I used pine nuts instead.

Chorizo, Tomato, & Pine Nut Cake

Adapted from Chocolate & Zucchini by Clotilde Dusoulier


1 tablespoon unsalted butter

2 tablespoons sesame seeds

1 1/4 cups unbleached AP flour

1 tablespoon baking powder

3 large eggs

1/2 teaspoon kosher salt

1/2 teaspoon black pepper

1/4 cup extra virgin olive oil

1/2 cup buttermilk (or plain, whole-milk yogurt)

3 1/2 ounces Mexican chorizo, cooked.

12 sun-dried tomato halves, packed in oil, finely diced

3/4 cup pine nuts, toasted

1/4 cup chopped flat-leaf parsley

Photobucket

  • Preheat the oven to 350F.
  • Butter a 9-inch loaf pan and sprinkle in 1 tablespoon of the sesame seeds, tilting the pan to distribute them.
  • In a small bowl, whisk together the flour, baking powder, salt, and pepper.
  • In a medium bowl, mix together the eggs, salt, and pepper. Add the oil and buttermilk .
  • Sift the dry ingredients into the egg mixture, stirring until barely incorporated. Don't overmix.
  • Gently fold in the chorizo, tomatoes, pine nuts, and parsley.
  • Scrape the batter into the prepared pan, smooth the top, and sprinkle with the remaining sesame seeds.
  • Bake for 40 to 50 minutes, until a knife inserted into the center comes out clean. Let cool for 15 minutes, then run a knife around the edge of the pan to get out the loaf.
Photobucket
  • Slice when cool. This is really important! My loaf was still warm--hot, really--when I sliced it and it was very crumbly!


November 4, 2008

Tuesdays with Dorie: Rugelach


Grace of Piggy’s Cooking Journal chose Rugelach for this week's Tuesdays with Dorie event.

I baked mine this afternoon, in preparation for a small election result-watching dinner party. They were a big hit.

Dorie's recipe calls for a simple dough (only flour, butter, cream cheese, & a pinch of salt) filled with marmalade, dried currants, nuts, and chocolate. I used black cherry jam, dried cranberries, & pecans (no chocolate).


Overall, this is a very easy recipe to throw together. The dough is mixed in a food processor, then formed into to disks that are chilled for a couple hours.


You simply roll out the chilled dough into two big circles, then top with the filling of your choice (you could use any combination of flavors in the filling), cut into triangles & roll up before baking.

October 29, 2008

Daring Bakers: Pizza

This month's Daring Bakers challenge was chosen by Rosa of Rosa's Yummy Yums. I was, as usual, excited about the recipe...pizza! I'd yet to make my own dough. But, once again (*sigh*) I waited until the last minute and made the pizzas last night.

Photobucket

Several weeks ago, Jerad and I had a pizza throwdown using dough from Trader Joe's. I made my pizza first, but his was much better since he learned from my mistakes. Since I had to make pizza for the Daring Bakers, I challenged Jerad to a Pizza Throwdown 2.0. This time, I made him go first.

I think both pizzas were very good, so we're calling this pizza throwndown a toss-up! (Get it?) The dough was easy and so tasty! It was much less challenging that I expected. The most difficult part is planning ahead!

Photobucket
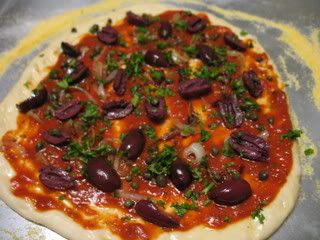
I went puttanesca style, topping my pizza with tomato & anchovy sauce (with red pepper flakes), caramelized onions, kalamata olives, capers, & parsley.
Photobucket
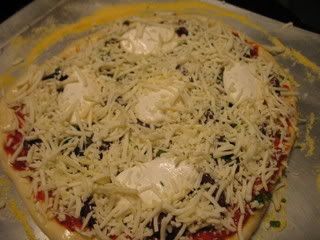
I then added fresh mozzarella slices & shredded mozzarella.

Photobucket
Jerad topped his with onions, pepperoni, mushrooms, & provel cheese.


~ BASIC PIZZA DOUGH ~

Original recipe taken from “The Bread Baker’s Apprentice”
by Peter Reinhart.

Makes 6 pizza crusts (about 9-12 inches in diameter).

Ingredients:
4 1/2 cups unbleached bread flour or all purpose flour, chilled
1 3/4 teaspoon salt
1 teaspoon instant yeast
1/4 cup olive oil
1 3/4 cups water, ice cold
1 tablespoon sugar
Semolina/durum flour or cornmeal for dusting

DAY ONE

Method:
1. Mix together the flour, salt and instant yeast in a big bowl (or in the bowl of your stand mixer).

2. Add the oil, sugar and cold water and mix well (with the help of a large wooden spoon or with the paddle attachment, on low speed) in order to form a sticky ball of dough. On a clean surface, knead for about 5-7 minutes, until the dough is smooth and the ingredients are homogeneously distributed. If it is too wet, add a little flour (not too much, though) and if it is too dry add 1 or 2 teaspoons extra water.

NOTE: If you are using an electric mixer, switch to the dough hook and mix on medium speed for the same amount of time.The dough should clear the sides of the bowl but stick to the bottom of the bowl. If the dough is too wet, sprinkle in a little more flour, so that it clears the sides. If, on the contrary, it clears the bottom of the bowl, dribble in a teaspoon or two of cold water.
The finished dough should be springy, elastic, and sticky, not just tacky, and register 50°-55° F.


Photobucket

3. Flour a work surface or counter. Line a jelly pan with baking paper/parchment. Lightly oil the paper.

4. With the help of a metal or plastic dough scraper, cut the dough into 6 equal pieces (or larger if you want to make larger pizzas).

NOTE: To avoid the dough from sticking to the scraper, dip the scraper into water between cuts.

5. Sprinkle some flour over the dough. Make sure your hands are dry and then flour them. Gently round each piece into a ball.

NOTE: If the dough sticks to your hands, then dip your hands into the flour again.
Photobucket
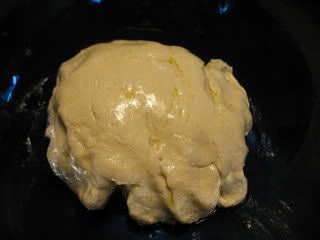
Dough before rising.

6. Transfer the dough balls to the lined jelly pan and mist them generously with spray oil. Slip the pan into plastic bag or enclose in plastic food wrap.

7. Put the pan into the refrigerator and let the dough rest overnight or for up to three days.

NOTE: You can store the dough balls in a zippered freezer bag if you want to save some of the dough for any future baking. In that case, pour some oil(a few tablespoons only) in a medium bowl and dip each dough ball into the oil, so that it is completely covered in oil. Then put each ball into a separate bag. Store the bags in the freezer for no longer than 3 months. The day before you plan to make pizza, remember to transfer the dough balls from the freezer to the refrigerator.
Photobucket
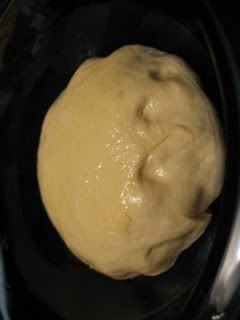
Dough after rising.

DAY TWO

8. On the day you plan to eat pizza, exactly 2 hours before you make it, remove the desired number of dough balls from the refrigerator. Dust the counter with flour and spray lightly with oil. Place the dough balls on a floured surface and sprinkle them with flour. Dust your hands with flour and delicately press the dough into disks about 1/2 inch thick and 5 inches in diameter. Sprinkle with flour and mist with oil. Loosely cover the dough rounds with plastic wrap and then allow to rest for 2 hours.

9. At least 45 minutes before making the pizza, place a baking stone on the lower third of the oven. Preheat the oven as hot as possible (500° F/260° C).

NOTE: If you do not have a baking stone, then use the back of a jelly pan. Do not preheat the pan.

10. Generously sprinkle the back of a jelly pan with semolina/durum flour or cornmeal. Flour your hands (palms, backs and knuckles). Take 1 piece of dough by lifting it with a pastry scraper. Lay the dough across your fists in a very delicate way and carefully stretch it by bouncing it in a circular motion on your hands, and by giving it a little stretch with each bounce. Once the dough has expanded outward, move to a full toss.

NOTE: Make only one pizza at a time. During the tossing process, if the dough tends to stick to your hands, lay it down on the floured counter and reflour your hands, then continue the tossing and shaping. In case you would be having trouble tossing the dough or if the dough never wants to expand and always springs back, let it rest for approximately 5-20 minutes in order for the gluten to relax fully,then try again. You can also resort to using a rolling pin, although it isn’t as effective as the toss method.

Photobucket

11. When the dough has the shape you want (about 9-12 inches in diameter - for a 6 ounces piece of dough), place it on the back of the jelly pan, making sure there is enough semolina/durum flour or cornmeal to allow it to slide and not stick to the pan.

12. Lightly top it with sweet or savory toppings of your choice.

NOTE: Remember that the best pizzas are topped not too generously. No more than 3 or 4 toppings (including sauce and cheese) are sufficient.

13. Slide the garnished pizza onto the stone in the oven or bake directly on the jelly pan. Close the door and bake for about 5-8 minutes.

NOTE: After 2 minutes baking, take a peek. For an even baking, rotate 180°.

If the top gets done before the bottom, you will need to move the stone or jelly pane to a lower shelf before the next round. On the contrary, if the bottom crisps before the cheese caramelizes, then you will need to raise the stone or jelly.


14. Take the pizza out of the oven and transfer it to a cutting board or your plate. In order to allow the cheese to set a little, wait 3-5 minutes before slicing or serving.

Photobucket

July 1, 2008

Tuesdays with Dorie: Apple Cheddar Scones

Photobucket

Kudos to Karina of The Floured Apron for choosing a savory recipe for this week's Tuesdays with Dorie post.

As seems to be the norm lately, I'm baking and posting at the last minute. It's 3:53 in the afternoon, and the scones are in the oven. I've just had a tough, emotional week, and since I had to make the Daring Bakers recipe over the weekend (I waited to the last minute for that, too!) the TWD recipe got pushed back.

Photobucket

Making the scones today was actually therapeutic for me. I think that's what I like so much about cooking...the act of creating something and the instant gratification of eating it. And the sharing. I've shared my baked treats with the wonderful women I work with, friends who come over for breakfast, and students in my classes.

These Apple Cheddar Scones (recipe available here) are very light and moist, made with cornmeal, apple (I used fresh instead of dried), and cheddar. They aren't very sweet, as the sweetness comes from only a hint apple juice and just a few tablespoons of sugar. They are very good, and I imagine they'd be even better with crisped bacon or ham added to them!

Photobucket

The dough is easy to work with, but very sticky! To form the scones, I patted the dough out just to form a rectangle, then cut it into 12 pieces (haphazard pieces).

Photobucket

Photobucket

Photobucket

I ate the scones with some mesquite butter that I made by mixing about a half stick of softened butter with 1/2 teaspoon of mesquite flour to create a smoky, nutty, slightly sweet spread.

Never used mesquite flour? Check back this weekend for some more info and recipes!