Showing posts with label originals. Show all posts

July 10, 2008

Tuna Melt Panzanella

So, I've never made panzanella...until Tuesday, that is. And, I even have a framed panzanella recipe hanging in my kitchen!

Photobucket
Yeah, that's me with Tyler Florence
(I was apparently in a soccer mom look-a-like phase, yikes).

Panzanella is a Tuscan bread salad that typically consists of day-old bread cubes, tomatoes, cucumbers, red onions, and a vinaigrette.

I've been eating lots of raw veggies lately and was looking for something a bit more substantial than the traditional panzanella recipe. So, I made up my own...inspired by a tuna melt sandwich (which I had been craving).

Tuna Melt Panzanella

For the bread cubes:

2 cup day-old bread cubes (I used a baguette)
2-3 tablespoons extra virgin olive oil
1 garlic clove, crushed
salt & pepper
1/2 cup shredded cheddar cheese (I used sharp cheddar)

Photobucket

Toss the bread with with the oil, garlic, salt & pepper. Arrange in a single layer on a baking sheet & top with the shredded cheese. Bake at 350 for about 5 minutes, or until the cheese is melted. Remove from oven.

Photobucket


For the salad:

1 can good quality tuna (I used an Italian brand of white albacore packed in olive oil)
1/2 small white onion, diced
1 stalk celery, diced
1 cup grape or cherry tomatoes, halved
1 tablespoon capers
1/8 teaspoon black pepper
2 tablespoons fresh parsley, chopped
1 tablespoon mayonnaise
1 hard boiled egg, peeled & sliced

Mix all ingredients in a large bowl. Add bread cubes. Toss with vinaigrette:

3 tablespoons white wine vinegar
1 tablespoon dijon mustard
1/2 cup extra virgin olive oil
salt & pepper

Whisk vinegar & mustard in a small bowl. Slowly drizzle in olive oil while whisking. Season with salt & pepper.

Photobucket

I finished the salad last night after class, and it was even better the next day. The bread cubes soaked up the flavors but were still crunchy!

June 15, 2008

Raw Beet Salad


For dinner last night, I tried a raw beet salad, taking a cue from Clotilde Dusoulier and Mark Bittman,

Photobucket

Raw beets are crunchy and only slightly sweet. If you don't like pickled, boiled, or roasted beets, I suggest you try this. The raw flavor is different--fresher and not as sweet--than that of cooked beets...and raw beets really are beautiful.

Photobucket

Raw Beet Salad

5-6 small or medium beets
2 garlic scapes, sliced
1/4 cup feta cheese
4-5 basil leaves, chopped
1 tablespoon extra-virgin olive oil
1 tablespoon apple cider vinegar
1 teaspoon dijon mustard
salt & pepper
  • Make the dressing by whisking together the oil, vinegar, & mustard with a pinch of salt & pepper.
  • Trim, peel, and slice the beets into matchsticks.
Photobucket
  • Add the garlic scapes & feta.
  • Pour in the dressing and stir.
  • Add the basil & serve.
Photobucket

Garlic scapes, I've discovered, are basically the flowering stems of cultivated garlic. They can be eaten raw or cooked. They have a crunchy texture, like raw green beans, and taste fairly heavily of garlic...though not as strong as raw garlic cloves.

Photobucket

Most people add them to stir-fries, but you can also grill them, add to scrambled eggs, make into pesto, or add raw to salads. In this salad, they provided a nice spicy contrast to the slightly sweet beets.

If you don't have garlic scapes, you can substitute chives.

May 18, 2008

Fava Bean Crostini

Photobucket

Cooking fava beans is a somewhat tedious process, but it's worth it.

Photobucket

There are about 3 or 4 beans per pod.

Photobucket

First, you have to get the beans out of the pods. It's easiest by snapping the end off and and splitting the pod down the seam. If that doesn't work, just squeeze the beans from the pods.

Photobucket

Once you have extracted all the beans, you have to boil them for 2-3 minutes. Then, plunge them into a bowl of ice water. Now, you have to pop the bean out of its waxy skin by gently squeezing it between your thumb and forefinger.

Photobucket
Fava carcasses.

Photobucket
Fava beans ready to eat!

At this point, you can add the beans to pastas, soups, salads, or...as I did...sauteed with thinly slices ramps (or garlic) and eaten on top of toasted baguette slices with ricotta salata cheese (or parmesan), sea salt, cracked black pepper, and a drizzle of olive oil

Photobucket

Fava bean crostini makes a wonderfully light spring dinner to enjoy with a glass of dry red wine.

Photobucket

May 4, 2008

Purple Potato & Ramp Gratin

I was invited to a friend's house for margaritas and girl-talk today, so I used some of the produce I got at the farmers market yesterday in a dish to take along.

I didn't really follow a recipe here; I just sort of improvised as I went. The result was a rich and flavorful gratin that was a festive color!


Ingredients:


6 purple potatoes, sliced
6 ramps, bulbs & stems only, diced
fresh herbed goat cheese, crumbled
1 pint heavy cream
1 cup shredded mozzarella & parmesan cheese
salt & pepper

Photobucket

Directions:

Butter a baking dish. Arrange potato slices in one layer. Top with 2 sliced ramps, some crumbled goat cheese, salt & pepper. Repeat layering until potatoes are all used. Pour in enough cream to just about cover all the potatoes (but you don't want them swimming in cream). Top with shredded cheeses. Cover with foil and bake at 350 until the potatoes are tender. Remove foil to brown cheese.

Photobucket

If you're not using herbed goat cheese, then sprinkle in some chopped herbs (thyme or rosemary would be nice) with the salt & pepper. I used a mild Herbs de Provence goat cheese, and the subtle hint of lavender was very tasty.

Photobucket

THANKS to Alanna for the free "Fresh & Local" icons!

April 25, 2008

Fig & Ginger Glazed Ribs

Today was a good day. It was my day off, but I got up early for a job interview (keeping my fingers crossed). Then, I had biscuits & gravy for breakfast (a rare indulgence). I cleaned. I cooked. More precisely...I worked up a sweat in the kitchen making ribs (my house got HOT), warm marinated potatoes, corn on the cob, and a special treat for dessert (check back on Sunday for details!).

It started storming in the early evening. I had the windows open, and the cool breeze fluttered the curtains. Cat hair balls tumbled out from under the sofas. I sat in front of the windows with a glass of wine, just listening to the rain and thunder and wind. Oliver (my cat) sat in the sill and enjoyed the mist in his face. Life was good.

Margaret came over for dinner. And, oh my god...the ribs! "I am a fucking genius," I thought. I'm not ashamed; these were damned good ribs! Margaret agreed; she said they were "possibly the best ribs I've ever had."

Photobucket

It was my first attempt at making ribs. I took the "low & slow" approach....season baby back ribs with salt & pepper, set in a roasting pan with a rack, cover tightly with foil, & bake at 250 for 4 hours. At about 3 1/2 hours, I took the foil off and brushed the ribs with a glaze made from McQuade's Celtic Chutney.

Photobucket

I won a jar of McQuade's Fig & Ginger Chutney on Blake Makes after suggesting that I'd use it to glaze ribs. They sent me the jar. I made ribs.

Photobucket

The chutney is really chunky, so I blended it in the food processor with a splash of orange juice, some garlic, salt & pepper. I brushed it on the ribs, then set the pan (uncovered) back in the oven for about 20 minutes. I glazed the ribs again, sprinkled them with a touch more salt & pepper (the chutney is pretty sweet), then baked them again for another 30 minutes or so...until the glaze was sticky.

Photobucket

Everything was perfect.

April 13, 2008

Mad Lemon Love

In his cookbook Small Bites, Big Nights Govind Armstrong says: "There's mad love you can make to a lemon."

Making lemon confit is like making love. It's slow and hot...and slippery. And totally worth the effort.

According to wiseGEEK, "
confit is a cooking term for a variety of foods, most often meats, preserved by being salted and cooked slowly in their own fat. Confit can also be also a condimentof fruit or vegetables cooked to the consistency of jam. In addition to meats, confit refers to other foods, including garlic or lemons, cooked and preserved in oil or lard in a similar method."

I had a couple Meyer lemons left that were squishifying rapidly, and so I made mad lemon love--err, confit--then used it to top an asparagus & goat cheese tart.

Lemon Confit & Asparagus Tart with Goat Cheese

Photobucket


Ingredients:

2 large Meyer lemons
1/2 cup (or more) extra virgin olive oil
3 garlic cloves, peeled
1 sheet puff pastry, thawed
1/2 cup shredded Parmesan cheese
1 bunch asparagus
1/4 cup goat cheese

To make the confit:


1. Peel lemon with vegetable peeler in long, wide strips. Place strips, pith side down, in a tall-sided skillet. Add juice from peeled lemons and the garlic cloves, then add enough olive oil to cover.

Photobucket

2. Let simmer on low 1 hour. Remove the garlic if it starts to brown.

3. Remove the pan from heat and let peels cool in the oil.

4. Carefully transfer the peels to a paper-towel lined plate. The peels are very soft & delicate; they will tear easily.

Photobucket

5. Keep the peels and the oil in a covered container in the refrigerator.

6. The lemon confit can be chopped and served with poached eggs on toast, with olives for bruschetta, in pasta, on salads...the possibilities are nearly endless.

To make the asparagus tart:

1. Preheat oven to 400 degrees.

2. Thaw one sheet of puff pastry at room temperature. Then, unfold it onto a lightly floured board. Cut the pastry on the folds to make three rectangles (you could also roll it out to make one large tart). Roll each piece slightly, then place on a baking sheet lined with parchment or silicone mat.

3. With a sharp knife, lightly score dough 1/2 inch (or 1 inch if making one large tart) in from the edges to mark a rectangle. Using a fork, pierce dough inside the markings. Bake until golden, about 10 minutes.

4.
Remove pastry shell from oven. If the middles have risen, lightly pat down with a fork to make room for the fillings. Sprinkle each tart with Parmesan. Trim the asparagus spears to fit inside the tart shell (I placed them diagonally) and arrange in a single layer. Brush with the confit oil. Dot with chopped lemon confit and crumbled goat cheese.

Photobucket

5. Bake until spears are tender, about 15 minutes, but be careful not to burn the crust.

Photobucket

I am submitting this recipe to Barbara of winosandfoodies.com, who hosts a blog event called A Taste of Yellow in conjunction with LIVESTRONG Day (which is on May 13 this year), the Lance Armstrong Foundation's one-day initiative to raise awareness and funds for the cancer fight. With her event, Barbara challenges other food bloggers to make a recipe featuring yellow foods "to remember those loved ones who are no longer with us, support those still fighting, and celebrate with those who have won the fight." Check Barbara's blog on May 13 for the recipe round-up!

March 31, 2008

Caramelized Pineapple & Bleu Cheese Tartlettes

Once again, I participated in the They Go Really Well Together event. This month's ingredients were pineapple and bleu cheese.

When I emailed the Port Club members to entice them to make recipes with me again, Sam replied, "Just pineapple and just bleu cheese sounds good to me!"

While I thought of all the things I could do with those two foods (I seriously considered a souffle!), I decided that Sam was right...just pineapple and just bleu cheese would be perfect.

So, I put together a simple snack for us to enjoy with our wine: I filled phyllo tartlette shells (the kind you buy in the frozen foods section) with a slice of fresh pineapple and a crumble of gorgonzola. I zapped it with a brulee torch to slightly melt the cheese and caramelize the pineapple.

Photobucket

The fire added a pleasing smokiness to the acidic pineapple and the tangy bleu cheese.

Sharon played along and made a delicious bleu cheese cheesecake topped with pineapple pepper jelly to eat with crackers.

Photobucket

Pineapple and bleu cheese didn't seem like such an odd combination to me, since I've always liked sweet fruit and strong cheese together. I was more curious to find out what kind of wine goes best with this combination. Red wine or port is a classic pairing with bleu cheese, but I had no idea what went with pineapple. I did some research online and discovered that many people suggested a late-harvest riesling. I just happened to have one in my fridge (a Hogue 2006 Late Harvest White Riesling from Columbia Valley), so I took that with me.

All in all, I tried four varietals: a sparkling Bouvay, a late-harvest Riesling, a dry red (I forget which kind; we had several open that night!) and a ruby port.

I liked the Riesling the best, even though I am not typically a sweet-wine drinker. The port was good, also. I thought the Bouvay and red wine were both too acidic for the pineapple.

February 29, 2008

Cocoa & Parmesan Throwdown

Cocoa & Parmesan are the theme ingredients for the They Go Really Well Together #9 event. According to Robert of lamiacucina, this month's host, this event challenges you to "create a recipe that pairs two (or three) ingredients that are not usually seen together. The theory is that if two ingredients have chemical compounds in common, then they should go well together in a recipe. With the blogging event we get to put the theory in practice."

I was talking about this event one day, and it evolved into a little battle, Iron Chef style. That is, I challenged the winery Port Club members to a Parmesan & cocoa throwdown. Three of us brought our creations to the winery last night and let the others (plus a couple customers & some people from the restaurant across the street) choose a winner.

After considering several different recipes (chocolate ravioli with pumpkin filling & a Parmesan-sage butter sauce, chocolate-dipped Parmesan crisps, chocolate shortbread topped with Parmesan chunks & balsamic syrup, cheese coins dusted with cocoa, Parmesan risotto with cocoa nibs), I finally decided on
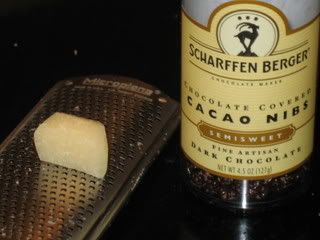
 Cocoa-Nibby Parmesan Biscotti.

I originally wanted to use plain cocoa nibs, roasted cocoa beans that have been separated from their husks and broken into small bits. But, I could only find dark chocolate-covered nibs. No worries, though, as that seemed to work out just fine!

Here is the recipe I used, inspired by Gourmet magazine's Parmesan Black-pepper Biscotti...

Ingredients:

4 cups all-purpose flour.
2 teaspoons baking powder.
2 teaspoons salt.
4 tablespoons dark chocolate-covered cocoa nibs.
2 1/4 cups (4 1/2 oz) Parmigiano-Reggiano, finely grated (buck up and get the real stuff!).
1 1/2 sticks cold unsalted butter, cut into 1/2-inch cubes.
4 eggs.
1 cup whole milk.

Photobucket

Directions:

  • Preheat oven to 350.
  • Mix flour, baking powder, salt, nibs, & 2 cups cheese in stand-mixer with paddle attachment.
  • Add in butter & mix until it resembles coarse meal. I did this with my hands to break up the big chunks of butter.
  • Whisk 3 eggs & the milk in a separate bowl, then add to flour and mix until combined.
  • Tip dough onto a lightly floured surface, knead just to bring it all together, & divide into 4 equal pieces.
  • Shape each piece into a log. Transfer to an ungreased baking sheet.
  • Whisk the remaining egg & brush over the logs. Sprinkle them with the remaining 1/4 cup of cheese.
Photobucket
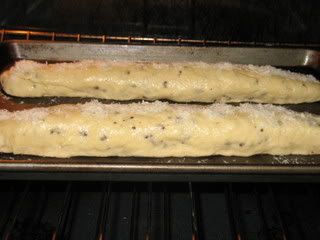
I only divided the dough into two pieces, so I had bigger logs.
  • Bake for about 30 minutes, or until lightly golden brown and firm.
  • Remove from oven & cool logs on rack for 10 minutes. Lower oven heat to 300.
Photobucket
  • Cut the logs into slices on the diagonal. Put them back on the baking sheet, with cut side down, and bake at 300--turning over once--until golden & crispy (about 35-45 minutes).
Photobucket
  • Cool on wire rack.
Photobucket
You could really taste the Parmesan in this biscotti, which were a bit softer in texture than traditional biscotti, and the cocoa nibs added a pleasing hint of sweetness.

Jerad made Chocolate-Parmesan Popcorn, a simple recipe made by tossing popped corn with grated cheese and melted bittersweet chocolate & butter, a delightfully salty-sweet treat:

Photobucket

Sharon made Chocolate-Dipped Parmesan Toasts, which were ultra-buttery and really delicious:

Photobucket

There were 8 judges who awarded points for use of theme ingredients, originality, taste, and appearance. Out of 96 total points, Sharon was the winner with 86 points! She blew us all away with a recipe that she came up on a whim!

February 21, 2008

Pantry Raid!

I woke up this morning to freezing rain, school cancellations, and "don't leave the house if you don't have to" warnings. So, I canceled my classes...we were just meeting in the library today anyway. Besides, I've been having some brake problems with my car (I am taking it to the shop on Monday) and the road in front of my house is covered with sleet. Cars aren't even able to get up the road. I decided not to risk it.

Since I'm homebound today, I figured it would be a good time to make something for Eating Out Loud's Food Fight event...a pantry raid! The rules are simple: Pick a random day (preferably not after you've just completed a shopping trip), take a picture of your pantry, then prepare a dish with several key ingredients from the pantry.

Easy, breezy.

Here's what my pantry/food cabinet looks like:

Photobucket

At first, I considered making something with pasta, beans, & tuna (things I always have on hand), but it was only 1:00 and I wanted something more "brunch-like," more rib-stickingly filling.

So, I made tomato herb polenta & poached eggs with:

2 cups water
1/2 cup corn meal
1 tablespoon fresh rosemary, finely chopped
1 teaspoon dried oregano
1 garlic clove, crushed
salt & pepper
1/2 cup grated Parmesan cheese
1/2 cup marinara sauce
2 eggs
olive oil, for drizzling
  • Bring the water to a boil in a non-stick saucepan.
  • Stir in the polenta, and stir until it thickens.
  • Add the herbs, garlic, a pinch of salt, & a couple cranks of black pepper.
  • Put a lid on the pan and cook on low for 5 minutes.
  • Poach the eggs in simmering water, drain.
  • Remove lid & stir in cheese & marinara sauce.
  • Spoon polenta into 2 bowls. Drizzle with olive oil. Add an egg to each.
  • Sprinkle with salt, pepper, and a bit more oregano & cheese (if desired).
Photobucket

Better with Booze: Vodka-Laced Mango Cupcakes

"It's better with booze" has always been a personal motto of mine.

Plain ol' pot roast for dinner? It's better with booze!

Boring baby shower? It's better with booze!

A cold winter night? It's better with booze!

Church? It's better with booze!

So, when I saw that the theme for this month's Cupcake Hero event was booze, I decided to whip up some liquor-laced goodies because....DESSERT IS BETTER WITH BOOZE!

I actually invented a recipe for this event, one which I am very proud of because--as I've said before--I'm no baker. I knew I wanted to do something with Absolut New Orleans, a mango & black pepper flavored vodka. So, this is a vanilla cupcake with a vodka-soaked mango center and vodka buttercream icing.

Photobucket

Never heard of Absolut New Orleans? It was released last fall, the first in a series to honor American cities. The flavors are supposed to represent the cities' cultural spirit, and all proceeds are donated to those cities.

Photobucket

Ingredients

For the cupcakes:

1 1/2 cups all-purpose flour
1 teaspoon baking powder
1/2 teaspoon salt
1 stick unsalted butter, room temperature
1 cup sugar
3 large eggs
1 1/2 teaspoon vanilla extract
3/4 cup milk
1 ripe mango
1/2 cup Absolut New Orleans vodka
  • Preheat oven to 350.
  • Peel and finely chop mango. Marinate mango in the vodka (use enough to cover completely) for 1/2 hour or more. Drain but save the juice for cocktails!
  • Sift together flour, baking powder, and salt. Set aside.
  • Cream butter and sugar. Add eggs, one at a time. Beat in extract.
  • Add flour & milk, alternately, to sugar mixture.
  • Fill 12 cupcake liners with 1 heaping tablespoon of batter.
  • Add 1 teaspoon of mango to each cupcake.
Photobucket
  • Top each with another heaving tablespoon of batter. Add more batter to each to fill liners 3/4 full.
  • Bake for 20 minutes or until cupcakes are done.
  • Remove from pan and let cool completely before icing.
For the icing:

1/3 cup unsalted butter, room temperature
1/4 teaspoon salt
1 teaspoon vanilla extract
3 1/2 cup powdered sugar, sifted
6 tablespoons Absolut New Orleans vodka
  • Cream butter, salt, & vanilla until light and fluffy.
  • Add sugar, gradually.
  • Add vodka, one tablespoon at a time, and beat until smooth.
  • If you're feeling sassy, add a couple cranks of black pepper to the icing.
  • Ice cupcakes.
  • Eat a bunch and catch a buzz.
Photobucket

February 11, 2008

A Sandwich & A Soup 4 One

It's been a bitter cold day, with temperatures in the teens and twenties. Brrr! There's been rain, sleet, and snow. My house is freezing-ass cold. I mean, I've literally been shivering all day...even after I guiltily jacked the heat up 2 whole degrees to 68 (I have to pay a nearly $700 utility bill this month, so I've been stingy with the thermostat). Therefore, I made some comforting meals to try to warm my body.

Lunch was a quick cheese steak panini on my new pan. I am so happy that I've finally figured out the intricacies of panini making; it's best to use a thick, crusty bread & wrap it in foil before pressing!

For one sandwich, you'll need:

1/2 onion, peeled & sliced
1/2 red bell pepper, sliced
olive oil
1 ciabatta roll
3 or 4 thin slices of steak or roast beef (I used cajun roast beef from the deli)
4 slices provolone cheese
salt & pepper
  • First, saute the onion & pepper (seasoned with a pinch of salt & a few grounds of black pepper) in a tad of olive oil until soft & slightly browned. Remove from heat. (I also seasoned mine with dash or two of Emeril's seasoning.)
  • Put a panini or grill pan on the stove over medium heat to get hot. If you're using a pan with a press, put the press in the pan to heat also. If you don't have a press, get out a heavy cast-iron skillet, a big heavy canned good, or a brick.
  • Cut the roll in half and fill with 2 slices of cheese, the meat, a spoonful of the veggies, and the remaining slices of cheese. Wrap tightly in foil.
  • Place the sandwich on the hot pan and weigh down with the lid or other such heavy object. Leave for 5 minutes.
  • Flip the sandwich, replace weight, and leave another 5 minutes.
  • Remove from pan and check to see if the bread is crispy & browned (a few blackened grill marks are more than okay) and the cheese is melted. If it's not, rewrap and leave on hot grill (with burner turned off) under the press for a few more minutes.
Dinner was another quick meal...garlic bread soup adapted from a Martha Stewart recipe:
  • Mash three cloves of garlic & a small pinch of kosher salt to a smooth paste. (I used a mortar & pestle.)
  • Saute the garlic and 1 tablespoon of extra-virgin olive oil in a small saucepan over low heat. You want to gently cook the garlic. Don't let it brown. And be careful not to breathe right over the pot. Wowza! It's very pungent; stings the nostrils.
  • Add about 2 ounces of stale, crusty bread cut into bite-sized chunks. (I used half of a demi baguette that I bought a couple days ago.) Stir to coat bread with the garlicky oil. Don't worry if the garlic is starting to stick to the pan; as long as it's not browning, you're okay.
  • Add 1 small can of reduced-sodium chicken stock OR 2 cups homemade chicken stock. Stir to deglaze the pan.
  • Season with a couple cranks of black pepper, a pinch of dried oregano & thyme...but taste it before adding salt.
  • Heat until it's just about to boil. You don't want to cook it too long, because the bread will get too soggy. Cook it just so it is hot enough to eat.
  • Pour into a bowl & top with shredded Parmesan cheese and--if desired--a bit of chopped parsley. Eat while it's steaming.
Photobucket

This is a very rustic soup...and we all know "rustic" is fancy food speak for "ugly." However, it is pretty good. Very fragrant and soothing. Tastes just like garlic bread. A light supper to slurp solo while watching television.

Photobucket