March 31, 2008

Caramelized Pineapple & Bleu Cheese Tartlettes

Once again, I participated in the They Go Really Well Together event. This month's ingredients were pineapple and bleu cheese.

When I emailed the Port Club members to entice them to make recipes with me again, Sam replied, "Just pineapple and just bleu cheese sounds good to me!"

While I thought of all the things I could do with those two foods (I seriously considered a souffle!), I decided that Sam was right...just pineapple and just bleu cheese would be perfect.

So, I put together a simple snack for us to enjoy with our wine: I filled phyllo tartlette shells (the kind you buy in the frozen foods section) with a slice of fresh pineapple and a crumble of gorgonzola. I zapped it with a brulee torch to slightly melt the cheese and caramelize the pineapple.

Photobucket

The fire added a pleasing smokiness to the acidic pineapple and the tangy bleu cheese.

Sharon played along and made a delicious bleu cheese cheesecake topped with pineapple pepper jelly to eat with crackers.

Photobucket

Pineapple and bleu cheese didn't seem like such an odd combination to me, since I've always liked sweet fruit and strong cheese together. I was more curious to find out what kind of wine goes best with this combination. Red wine or port is a classic pairing with bleu cheese, but I had no idea what went with pineapple. I did some research online and discovered that many people suggested a late-harvest riesling. I just happened to have one in my fridge (a Hogue 2006 Late Harvest White Riesling from Columbia Valley), so I took that with me.

All in all, I tried four varietals: a sparkling Bouvay, a late-harvest Riesling, a dry red (I forget which kind; we had several open that night!) and a ruby port.

I liked the Riesling the best, even though I am not typically a sweet-wine drinker. The port was good, also. I thought the Bouvay and red wine were both too acidic for the pineapple.

March 30, 2008

I am a Daring Baker.

So, I’ve joined another baking/blogging group. You see, as I’ve said numerous times before, I am not a baker. But, I thought joining a couple baking groups would inspire me to make things I wouldn’t normally.

Photobucket

The Daring Bakers are a group of bloggers who all make the same recipe once a month. The recipe is kept secret from the non-daring bakers until the post date.

I’d been seeing the Daring Bakers pop up in the blogosphere and decided to join to see what it’s all about. Membership allows me access to the secret blog, where recipes and discussions are posted.

I was excitedly anticipating the reveal of my first daring recipe, the choice for March’s challenge.

January’s recipes was for lemon meringue pie. Fairly easy, I thought. But, then I saw what some of those people did with lemon meringue pie. Fancy-schmancy. I’m in trouble, I thought.

Then, I saw the recipe for February...Julia Child’s French Baguettes. I’m doomed, I thought. I had managed no-knead bread, but there is no way I could handle classic French bread...a recipe that takes up like a dozen pages in Child’s Mastering the Art of French Cooking.

I got nervous. What would the next recipe be? Would I be able to manage it? Or would I crack? Would I not live up to the Daring Baker credo? Would I not get that oh-so-cute logo to slap on my blog? Oh no!

But, I was pleasantly surprised to discover that the recipe was for a “Perfect Party Cake” from Dorie Greenspan’s Baking: From my Home to Yours...the same book from which the Tuesdays with Dorie group bakes.

This dessert is a lemon cake with raspberry filling, lemon meringue buttercream, and coconut...the perfect choice for spring. The coconut-covered cake reminded me of that lamb cake my Grandma Green used make each year for Easter. So, in homage, I made the cake on Easter Sunday.

Photobucket

I’d never made a meringue buttercream before, but thought it was pretty easy...even though I whipped the egg whites & sugar by hand (I can’t find my KitchenAid whip attachment). The icing becomes fluffy and light...so good. It’s something I will definitely make again.

I did have a bit of a problem with the cake, though. My oven seems to be a bit off-kilter, so cake batter runs to the back of the pans & causes the cakes to come out unevenly. I can compensate for this by stacking the cakes with the thin sides lined up to the thick sides. However, this recipe called for slicing each cake in half to form four layers. I didn’t think that would work, because the thin sides were really thin. Instead, I decided to just make a two-layer cake with more raspberry filling.

Photobucket

Unfortunately, I added a bit too much raspberry and the cakes wouldn’t stay still. The top layer kept sliding around, making it a bit difficult to ice–and later slice–the whole thing. The layers didn’t really stick together...until later, once some of the filling soaked into the cake.

Nevertheless, I was pretty proud of my homemade cake. This baking thing isn’t so hard, I thought.

Photobucket

Then, I saw everyone else’s cakes on our secret bakers blog. Gulp. Fancy again! There were snazzy icing jobs & decorations galore. I felt so...boring, so...unworthy. Since it was my first challenge, I tried to follow the recipe verbatim. I didn’t even think about fancying up the thing

Next month, though...Fancyville, here I come.

Perfect Party Cake
Photobucket

For the Cake

2 1/4 cups cake flour
1 tablespoon baking powder
½ teaspoon salt
1 ¼ cups whole milk or buttermilk (I prefer buttermilk with the lemon)
4 large egg whites
1 ½ cups sugar
2 teaspoons grated lemon zest
1 stick unsalted butter, at room temperature
½ teaspoon pure lemon extract

For the Buttercream
1 cup sugar
4 large egg whites
3 sticks (12 ounces) unsalted butter, at room temperature
¼ cup fresh lemon juice (from 2 large lemons)
1 teaspoon pure vanilla extract

For Finishing
2/3 cup seedless raspberry preserves stirred vigorously or warmed gently until spreadable
About 1 ½ cups sweetened shredded coconut

Getting Ready
Center a rack in the oven and preheat the oven to 350 degrees F. Butter two 9 x 2 inch round cake pans and line the bottom of each pan with a round of buttered parchment or wax paper. Put the pans on a baking sheet.

To Make the Cake
  • Sift together the flour, baking powder and salt.
  • Whisk together the milk and egg whites in a medium bowl.
  • Put the sugar and lemon zest in a mixer bowl or another large bowl and rub them together with your fingers until the sugar is moist and fragrant.
  • Add the butter and working with the paddle or whisk attachment, or with a hand mixer, beat at medium speed for a full 3 minutes, until the butter and sugar are very light.
  • Beat in the extract, then add one third of the flour mixture, still beating on medium speed.
  • Beat in half of the milk-egg mixture, then beat in half of the remaining dry ingredients until incorporated.
  • Add the rest of the milk and eggs beating until the batter is homogeneous, then add the last of the dry ingredients.
  • Finally, give the batter a good 2- minute beating to ensure that it is thoroughly mixed and well aerated.
  • Divide the batter between the two pans and smooth the tops with a rubber spatula.
  • Bake for 30-35 minutes, or until the cakes are well risen and springy to the touch – a thin knife inserted into the centers should come out clean
  • Transfer the cakes to cooling racks and cool for about 5 minutes, then run a knife around the sides of the cakes, unfold them and peel off the paper liners.
  • Invert and cool to room temperature, right side up (the cooled cake layers can be wrapped airtight and stored at room temperature overnight or frozen for up to two months).
To Make the Buttercream
  • Put the sugar and egg whites in a mixer bowl or another large heatproof bowl, fit the bowl over a plan of simmering water and whisk constantly, keeping the mixture over the heat, until it feels hot to the touch, about 3 minutes.
  • The sugar should be dissolved, and the mixture will look like shiny marshmallow cream.
  • Remove the bowl from the heat.
  • Working with the whisk attachment or with a hand mixer, beat the meringue on medium speed until it is cool, about 5 minutes.
  • Switch to the paddle attachment if you have one, and add the butter a stick at a time, beating until smooth.
  • Once all the butter is in, beat in the buttercream on medium-high speed until it is thick and very smooth, 6-10 minutes.
  • During this time the buttercream may curdle or separate – just keep beating and it will come together again.
  • On medium speed, gradually beat in the lemon juice, waiting until each addition is absorbed before adding more, and then the vanilla.
  • You should have a shiny smooth, velvety, pristine white buttercream. Press a piece of plastic against the surface of the buttercream and set aside briefly.
To Assemble the Cake
  • Using a sharp serrated knife and a gentle sawing motion, slice each layer horizontally in half.
  • Put one layer cut side up on a cardboard cake round or a cake plate protected by strips of wax or parchment paper.
  • Spread it with one third of the preserves.
  • Cover the jam evenly with about one quarter of the buttercream.
  • Top with another layer, spread with preserves and buttercream and then do the same with a third layer (you’ll have used all the jam and have buttercream leftover).
  • Place the last layer cut side down on top of the cake and use the remaining buttercream to frost the sides and top.
  • Press the coconut into the frosting, patting it gently all over the sides and top.
Photobucket

Serving
The cake is ready to serve as soon as it is assembled, but I think it’s best to let it sit and set for a couple of hours in a cool room – not the refrigerator. Whether you wait or slice and enjoy it immediately, the cake should be served at room temperature; it loses all its subtlety when it’s cold. Depending on your audience you can serve the cake with just about anything from milk to sweet or bubbly wine.

Storing
The cake is best the day it is made, but you can refrigerate it, well covered, for up to two days. Bring it to room temperature before serving. If you want to freeze the cake, slide it into the freezer to set, then wrap it really well – it will keep for up to 2 months in the freezer; defrost it, still wrapped overnight in the refrigerator.

Playing Around
Since lemon is such a friendly flavour, feel free to make changes in the preserves: other red preserves – cherry or strawberry – look especially nice, but you can even use plum or blueberry jam.

Fresh Berry Cake
If you will be serving the cake the day it is made, cover each layer of buttercream with fresh berries – use whole raspberries, sliced or halved strawberries or whole blackberries, and match the preserves to the fruit. You can replace the coconut on top of the cake with a crown of berries, or use both coconut and berries. You can also replace the buttercream between the layers with fairly firmly whipped sweetened cream and then either frost the cake with buttercream (the contrast between the lighter whipped cream and the firmer buttercream is nice) or finish it with more whipped cream. If you use whipped cream, you’ll have to store the cake the in the refrigerator – let it sit for about 20 minutes at room temperature before serving.

Photobucket

March 26, 2008

Magic Bullet Mexican Night

So, my friends Jesse & Sara have a Magic Bullet. I saw it on their kitchen counter a few weeks ago when I was there for dinner.

"Why do you have a Magic Bullet?"

"We got it as a gift."

"Have you made all those things they do on the infomercial?"

"We've never even seen the infomercial!"

"You're joking! That's great television...1, 2, 3, NACHOS!"

"But, we do have the little cookbook that came with it!"

"We should have a Magic Bullet dinner night...everything made from that cookbook."

And so, the Magic Bullet Mexican Night was born.

Photobucket
Sara started the night by blending up some Seven Second Salsa.

Photobucket
Next was Speedy Guacamole.

Photobucket
The Before You Know It Bean Dip was a bit thin, but it tasted pretty good.

Photobucket
Jesse made margaritas.

Photobucket
Only the best ingredients go into the Magic Bullet.

Photobucket
It actually made good margaritas.

Photobucket
And it was easy to salt the color-coded rings.

Photobucket
The Magic Bullet: A Shit-load of Class!

Photobucket
The main dish was chicken quesadillas.

Photobucket
Jesse couldn't understand why we were blending the quesadilla filling into a mush. Because, Jesse, that's what the Magic Bullet cookbooklet said to do!

Photobucket
The blended chicken looked like cat food.

Photobucket
But, I didn't think it tasted all that bad.

Photobucket
Next time, I'm making this drink.

So, we decided that the Magic Bullet is really a pain in the ass. Sure, it was okay for dips (the salsa was quite good, but it would be easier in a food processor). It is really perfect for margaritas one-at-a-time. Sara & Jesse said they use it most to make smoothies and grind coffee beans. I bet it would be good for making baby food as well.

We had so much fun with the Magic Bullet, that we talked about trying other "As seen on TV" kitchen products. Any suggestions?

If anyone has a sandwich maker, Foreman grill, pancake pan, Batter Pro, any Ronco product, or other such appliances, we'd be more than happy to take them off your hands and use them for our product experiments. I'm serious. Just send them (and their cookbooks) our way, we'll make dinner with them, then I'll write about it here!

Quick Cassoulet

After reading Bill Burge's (of stlbites.com) comment about cassoulet in November, I couldn't stop thinking about that Southern French dish. For those of you who aren't familiar with cassoulet, it's a slow-cooked stew typically containing beans, sausage, duck, and lamb.

I've looked at several cassoulet recipes, but ultimately decided that it would be easier and cheaper to order it at a restaurant than make it at home...duck confit and all. Alas, I never went out for cassoulet this winter.

Instead, I made a quick version of cassoulet for dinner on Sunday--with chicken, sausage, bacon, & beans--adapted from one of those little Pillsbury cookbook pamphlets you see in the supermarket checkout lane. It's the first, and only, one I've ever bought, but I wanted to see if the recipes were any good.

I really liked this cassoulet, which is actually just a hip, fancy way to mean casserole (casserole is like so 1970s)...and I will definitely make it again.

Sausage & Chicken Cassoulet
Prep Time: 30 minutes. Start to Finish: 1 hour, 15 minutes.
Makes 6 servings.

Ingredients:

4 slices thick-cut bacon, cut into 1-inch pieces
6 chicken thighs
1 cup baby carrots
1 medium onion, chopped (1/2 cup)
dried thyme leaves
salt
black pepper
12 ounces Polish sausage, cut into 1/2-inch pieces
2 cans (15 oz each) cannellini beans, drained & rinsed
1 can (14.5 oz) diced tomatoes with garlic

Directions:

  • Heat oven to 350.
  • In a 12-inch nonstick skillet, cook bacon over medium-high heat until crisp. Remove & drain on paper towels. Reserve 1 tablespoons of drippings.
  • Season chicken with salt, pepper, & thyme. Add chicken, skin side down, to skillet. Cook, turning once, until brown on both sides. Remove from pan.
  • Add carrots & onion, season with a pinch of salt & pepper, to pan and cook about 5 minutes.
  • In an ungreased 13x9-inch baking dish, mix sausage, beans, tomatoes, bacon, carrots & onions, and a teaspoon of thyme. Top with chicken, skin side up. Cover with foil.
  • Bake 30-45 minutes, or until the chicken is cooked through (the juice should run clear & meat should register 180 degrees).
Photobucket

March 25, 2008

Caramel-Topped Flan

This week's Tuesdays with Dorie recipe was chosen by Stephanie of A Whisk and a Spoon. I was excited that the recipe was for something I'd never made before...FLAN!

Photobucket

I actually have a bit of history with the flan. I think I've always been a foodie at heart, because in school I used to always be fascinated with the foods sections of our health textbooks. Then, when I took Spanish classes in high school, I loved browsing the food chapter. That's where I first discovered flan. I remembered seeing flan on the menu at Mexican restaurants, but not really understanding what it was. After taking Spanish, I wanted to try flan so bad! I finally talked my parents into letting me order it when we were out to dinner one night. My mom said I wouldn't like it. She said it had the consistency of snot. I wanted to try it anyway. And, she was right. I didn't like it at all!

Many years later, I was having dinner at my best friend's house, and she had made flan for dessert. "Ugh," I moaned. "I hate flan!" But, my tastebuds and sensibilities had changed with age, and the adult me really liked the flan.

All in all, flan is a fairly easy dessert to make. I was worried, however, when I took the flan out of the oven as it seemed a bit too jiggly. You see, I don't think my oven's temperature is accurate (I know, I know...I need to get an oven thermometer), and I usually cook things a lot less than required.

The flan was no different. The recipe says to bake it "until the top puffs a bit and is golden here and there," about 35 minutes. Well, after only 20 minutes, my flan was puffed and golden--on the verge of burnt--so I took it out of the oven.

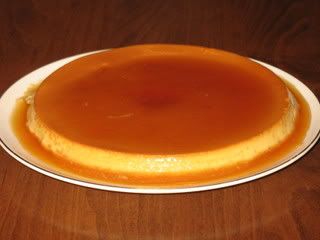
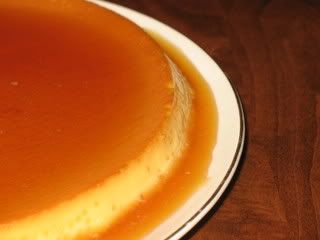
After chilling, the flan moved around in the pan easily but seemed to be set. The caramel was very runny--not thick and caramel-like--but had a nice sweet, toasted flavor. The custard set perfectly.

Caramel-Topped Flan- makes one 8″x2″ flan
from Dorie Greenspan’s Baking: From My Home to Yours

Note: You can make individual servings by using six 6-oz or seven or eight 4-oz ramekins or containers instead of the larger cake pan.

For the caramel:
1/3 cup sugar
3 tablespoons water
squirt of fresh lemon juice

For the flan:
1 1/2 cups heavy cream
1 1/4 cups whole milk
3 large eggs
2 large egg yolks
1/2 cup sugar
1 teaspoon pure vanilla extract

Getting ready:
-Center a rack in the oven and preheat the oven to 350ºF. Line a roasting pan or 9″x13″ baking pan with a double thickness of paper towels. Fill a teakettle with water and put it on to boil; when the water boils, turn off heat.

-Put a metal 8″x2″ round cake pan– not a nonstick one– in the oven to heat while you prepare the caramel. (If you are using individual molds or ramekins, then skip this step.)

To Make the Caramel:
-Stir the sugar, water and lemon juice together in a small heavy-bottomed saucepan. Put the pan over medium-high heat and cook until the sugar becomes an amber-colored caramel, about 5 minutes-remove the pan from the heat at the first whiff of smoke.

-Remove the cake pan from the oven and, working with oven mitts, pour the caramel into the pan and immediately tilt the pan to spread the caramel evenly over the bottom; set the pan aside.

To Make the Flan:
-Bring the milk and heavy cream just to a boil.

-Meanwhile, in a 2-quart glass measuring cup or in a bowl, whisk together the eggs, yolks and sugar. Whisk vigorously for a minute or two, and then stir in the vanilla. Still whisking, drizzle in about one quarter of the hot liquid-this will temper, or warm, the eggs so they won’t curdle. Whisking all the while, slowly pour in the remainder of the hot cream and milk. Using a large spoon, skim off the bubbles and foam that you worked up.

-Put the caramel-lined cake pan in the roasting pan. Pour the custard into the cake pan and slide the setup into the oven. Very carefully pour enough hot water from the kettle into the roasting pan to come halfway up the sides of the cake pan. (Don’t worry if this sets the cake pan afloat.) Bake the flan for about 35 minutes, or until the top puffs a bit and is golden here and there. A knife inserted into the center of the flan should come out clean. (Small, individual molds will take less time– start checking for doneness around the 25-minute mark).

-Remove the roasting pan from the oven, transfer the cake pan to a cooking rack and run a knife between the flan and the sides of the pan to loosen it. Let the flan cool to room temperature on the rack, then loosely cover and refrigerate for at least 4 hours.

-When ready to serve, once more, run a knife between the flan and the pan. Choose a rimmed serving platter, place the platter over the cake pan, quickly flip the platter and pan over and remove the cake pan–the flan will shimmy out and the caramel sauce will coat the custard.

Storing: Covered with plastic wrap in its baking pan, the flan will keep in the refrigerator for up to 2 days. However, once unmolded, its best to enjoy it the same day.

Serving: Bring the flan to the table and cut into wedges. Spoon some of the syrup onto each plate.

Playing Around– Caramel-topped coconut flan: For a more tropical flan with a somewhat lighter texture, replace the heavy cream with a 15-oz can of unsweetened coconut milk and reduce the amount of milk to 1 cup.

Photobucket

March 23, 2008

Taste & Create: Broccoli Pesto Pasta

I was paired with Canadian blogger "Bellini Valli" of More Than Burnt Toast for this month's Taste & Create event.

She has loads of great looking food on her blog, so many good recipes that it took me a while to decide what to make! I originally planned to make her Favourite Falafel, but never planned ahead with the bean soaking (I will make that soon, though!). Instead, I opted to make the
Broccoli Pesto Pasta, which she says is "a delicious rendition of pesto to make this time of the year when broccoli is readily available and basil is not. What a great idea!

Here's the recipe:

2 cups fresh broccoli florets
1/2 cup fresh Italian parsley or perhaps cilantro
1 - 2 cloves garlic
1/4 cup pine nuts or walnuts(toasted)
1/4 cup shredded fresh Parmigiano Reggiano cheese
1/2 cup part-skim ricotta cheese
2-4 T extra virgin olive oil
sprinkle of red pepper flakes
  • Fill a medium saucepan three-quarters of the way full with water. Bring to a boil over medium high heat. Add the broccoli and cook for 3 minutes or just until slightly tender, but still with a bit of snap. Drain and immediately immerse the broccoli in ice cold water to retain the bright green color. Drain again, and transfer the broccoli to the work bowl of a food processor fitted with a metal blade.
  • Add parsley, garlic, pine nuts, Parmigiano-Reggiano, and ricotta cheese. Pulse 6-8 times, until the mixture forms a chunky paste. Do not puree! Pulse again, drizzling in a few tablespoons of olive oil at a time. When the mixture reaches the desired consistency, stop and serve immediately with pasta of your choice, or store in an airtight container in the refrigerator for up to one week.
Sauce before blending...
Photobucket

Sauce after blending...
Photobucket

This had really great flavor, but the texture was a bit too dry. I think that was my fault, though, as I seemed to have used too much sauce & not enough pasta. See?
Photobucket

This is what the Bellini's original recipe looked like:
Photobucket

I am planning to try this again for lunch this week, but I'll leave out the ricotta and add more olive oil...more like a traditional pesto. Nevertheless, I think this broccoli ricotta mixture would be mighty tasty spread on crispy baguette slices!

Bellini made the artichoke bread I took to Port Club last August. Check out her post!

March 22, 2008

Snow Day Mac & Cheese (UPDATED)

All of my classes at both colleges were canceled on the 4th due to the weather. It had been snowing all day; we were supposed to get 6-8 inches total.

It was a nice surprise to have the day off, especially a Tuesday which is normally my non-stop 12-hour day. I wanted to cook something comforting & warming, so I decided to try another version of mac & cheese.

I wanted to try one of Paula Deen's recipes, but most of them call for sour cream and I didn't have any of that in my fridge. Instead, I created my own "ultimate" mac & cheese with what I had on hand. Luckily, I like cheese and had several options to choose from...including brie, shredded cheddar jack, swiss, muenster, Parmesan, and American.

Here's the fly-by-the-seat-of-my-pants, I-am-not-digging-my-car-out-of-the-snow recipe:

1 pound pasta shells
1/2 cup shredded cheddar jack
1/2 cup muenster, cubed
1/2 cup brie, rind removed & cubed
1 cup heavy cream
1/2 stick butter
1/4 cup bread crumbs
1/4 cup grated parmesan
1 teaspoon fresh rosemary, finely chopped
garlic powder
salt & pepper
  • Cook pasta according to package, just to al dente, then drain & return to pot.
  • Add butter to hot pasta & stir until melted. Add cheeses & cream. Season with salt & pepper.
  • Pour into a buttered casserole dish.
  • Mix together the bread crumbs, parmesan, & a dash of garlic powder. Sprinkle over pasta.
  • Bake at 350 until cheese is melted & top is browned. 15-20 minutes or so.
The chunks of brie got melted so that every once in a while I'd get a tangy bite of brie. It was...interesting. Overall, it was a stringy-cheesy mac. Not my best, but satisfying on that blustery snow day.

So, I am STILL looking for that perfect mac & cheese recipe. I want it to be creamy, but retain a bit of cheesy-stringiness.

What's your favorite mac & cheese?

March 21, 2008

I've been cooking....

....even though I haven't been blogging much the past couple weeks. The wireless Internet signal I've been pilfering from a neighbor has been security-enabled, so I haven't been able to get online at home. I've finally had to give in and actually PAY for Internet service; it will be hooked up on Tuesday.

Anyway, I made some delicious corned beef hash for breakfast on Wednesday. I'll post the recipe & pictures next week when I am online--legally--once again. Also, stay tuned for a couple desserts, a quick cassoulet, and falafel next week!

Until then, have a great weekend...and Happy Easter!

Cubans

Before I went on vacation, I invited the Port Club members over for some Cuban sandwiches...and to show off my gorgeous panini pan.

I didn't really use a recipe, though I did research what makes up the traditional Cuban sandwich. Here's what ya gotta do:

1. Cook a pork roast. I did this in the crockpot the day before. I cooked it in a bit of orange juice & water with garlic, oregano, cumin, salt, and pepper. Shred it up with it's done.

2. Get some thick cut ham (not wafter-thin sliced) from the deli and some hoagie rolls. You want the bread to get crispy on the outside when you grill it, but you want it to be a soft roll...not hard or chewy that a baguette or ciabatta.

3. Layer rolls with some pork, ham, sliced dill pickles, yellow mustard, and swiss cheese. Wrap in foil.

4. Grill on the pan with press a few minutes on each side. You want the meat to warm, the cheese to melt, and the bread have a crunch. Grill marks are good, too.

Overall, I was pretty happy with how these turned out. And, the Port Club seemed to like them too!

Photobucket

March 13, 2008

Vacation Shrimps

Photobucket

I've been on vacation all week. This is the first year since I've been teaching college courses (8 years!) that my spring break at both schools has fallen on the same week, so I actually got to take a break.

I made this shrimp dish last weekend, and since I am still on vacation, I am not going to write much about it...just going to post the recipe, which is so good that I am going to make it again soon for friends at home.

I didn't follow a particular recipe; I just sort of made it up as I went, so I am posting it just as I cooked it:

1. Melt 1 stick of unsalted butter with 1 clove of garlic (finely chopped) in a big stock pot or large, deep skillet over medium heat. Don't let the butter brown.

2. When it is melted, turn the heat to low and add a couple glugs of a dry white wine, the juice of a lemon, and a whole bunch of Old Bay seasoning (start with 2 tablespoons, then add more to taste). Bring to a simmer (turn up heat if need be, but just watch so that the butter doesn't brown).

3. Dump in 1 pound of medium-large shrimp (unpeeled), stir, cover & cook (stirring occasionally) until shrimp are pink and just cooked through.

4. Pour out onto large platter or bowl. Sprinkle with a bit more Old Bay. Eat with your fingers, a crusty baguette for dipping into the sauce, and many beers.

Photobucket

March 12, 2008

Apple Pie Confession

Photobucket

I must confess. I lied to my friends. I am a fraud, a phony. I am so ashamed.

Last fall, I was desperate to make a from-scratch apple pie. But...when I got around to it, with my bag of apples from the orchard, I chickened out on the crust. I was too scared. Instead, I faked it--or at least tried to--by using frozen pie crusts. I am pretty sure no one was fooled, though no one busted me.

Though a frozen crust isn't all that horrible, my filling was. I used Jonathan apples that were pre-bagged by the orchard (there was no, or sporadic, pick-your-own last summer because of a late spring frost that killed most of the apple blooms), apples that were starting to get mushy. And, I must have cut them too thin...the filling was pretty goopy.

So, I was pretty excited a couple months ago when the St. Louis food bloggers group met for a special pie making class at Kitchen Conservatory. Unfortunately, at the last minute, I couldn't attend because of frozen pipes. But, when Alanna announced a Pi Day event, I decided I had to bite the bullet and make my own crust...finally.

Apple Pie
adapted from Martha Stewart

For the crust:

2 1/2 cups all-purpose flour
1 teaspoon salt
1 teaspoon sugar
1 cup (2 sticks) unsalted butter, chilled and cut into small pieces
1/4 to 1/2 cup ice water
  • In the bowl of a food processor, combine flour, salt, and sugar. Add butter, and process until the mixture resembles coarse meal, 8 to 10 seconds.
Photobucket
  • With machine running, add ice water in a slow, steady stream through feed tube. Pulse until dough holds together without being wet or sticky; be careful not to process more than 30 seconds. To test, squeeze a small amount together: If it is crumbly, add more ice water, 1 tablespoon at a time.
  • Divide dough into two equal balls. Flatten each ball into a disc and wrap in plastic. Transfer to the refrigerator and chill at least 1 hour. Dough may be stored, frozen, up to 1 month.
For the filling:

5 tablespoons all-purpose flour, plus more for work surface
1 large egg yolk
1 tablespoon heavy cream
4 pounds assorted cooking apples, peeled, cored, and cut into 1/4-to 1/2-inch-thick slices
3 tablespoons fresh lemon juice
1/2 cup granulated sugar
1/4 teaspoons ground cinnamon
1/4 teaspoon ground nutmeg
1/4 teaspoon salt
1/4 cup cold (1/2 stick) unsalted butter, cut into 1/2-inch pieces
Sugar, for sprinkling
  • Preheat oven to 400.
  • Turn out 1 piece of dough onto a lightly floured work surface. Roll into a 13-inch round, about 1/8 inch thick.
Photobucket
I don't have a rolling pin, so I used an empty wine bottle!
  • Fit into 9-inch pie plate. Trim edges flush with rim. Refrigerate while making filling.
Photobucket
  • Put apples, lemon juice, granulated sugar, flour, cinnamon, nutmeg, and salt in a large bowl; toss to combine. Fill pie shell with apple mixture, and dot with butter.
  • Whisk egg yolk and cream in a small bowl; set egg wash aside.
Photobucket
I used a combination of Granny Smith & Gala apples.
  • Roll out remaining dough on parchment paper to a 13-inch round, about 1/8 inch thick.
  • Lightly brush edge of pie with a wet pastry brush. Place dough round on top of pie. Trim edges flush with rim; press to seal. Crimp edges as desired. Make four 1/2-inch slits in center of pie. Brush top with egg wash; sprinkle with sanding sugar.
Photobucket
  • Place pie on a baking sheet. Bake until crust begins to turn golden brown, about 20 minutes. Reduce oven temperature to 350 degrees. Bake until crust is golden brown and juices are bubbling, about 35 minutes. Cover with foil if browning too quickly. Let cool completely on a rack.
Photobucket

Overall, I was pleased with my first attempt at pie dough...though, I don't think it was "tender" enough. I think I pulsed it too much, as there were no visible specks of butter in my flour; I'll try the hand-mixed method suggested by Anne next time.

The filling didn't cook enough, even though I left it in the oven longer than the recipe called for. The apples were still pretty crunchy, and there was a bit of watery liquid on the bottom...which made the bottom crust soggy. Next time, I'll cut the apples a bit thinner (I think I went too thick this time!) and add more spices....AND peel them. I'm not sure how I missed that step in the directions!

All in all, though, I am no longer afraid of pie crust...and I can't wait to pick apples this fall!

Photobucket

March 5, 2008

Cooking with Tarragon: Bernaise Sauce

The beef stroganoff I made a couple weeks ago was my first time cooking with tarragon. I was a little leery, at first, because it smells so strongly of black licorice...and I am not such a fan of black licorice. Still, it lent a nice herby--not candyish--taste to the beef stroganoff.

Photobucket
Tarragon is related to wormwood and has the same anise aroma and flavor.

I've noticed that many French dishes call for tarragon, and Nigel Slater uses it often. So, I decided to try another recipe with tarragon since I still had some in the fridge.

I made a Bernaise sauce, Ina Garten's blender version, to go on some seared London Broil:

Ingredients
1/4 cup Champagne or white wine vinegar
1/4 cup good white wine
2 tablespoons minced shallots
3 tablespoons chopped fresh tarragon leaves, divided
Kosher salt
Freshly ground black pepper
3 extra-large egg yolks
1/2 pound (2 sticks) unsalted butter, melted

  • Put the vinegar, wine, shallots, 1 tablespoon tarragon leaves, 1/4 teaspoon salt, and 1/4 teaspoon pepper in a small saucepan. Bring to a boil and simmer over medium heat for about 5 minutes, until the mixture is reduced to a few tablespoons. Cool slightly.
Photobucket
  • Place the cooled mixture with the egg yolks and 1 teaspoon salt in the jar of a blender and blend for 30 seconds.

  • With blender on, slowly pour the hot butter through the opening in the lid.

  • Add the remaining 2 tablespoons of tarragon leaves and blend only for a second. If the sauce is too thick, add a tablespoon of white wine to thin. Keep at room temperature until serving.

Note: To make the sauce in advance, prepare an hour before serving and allow it to sit in the blender. Before serving, add 1 tablespoon of the hottest tap water and blend for a few seconds.

Photobucket

London Broil with Bernaise, spinach, & garlic toasts:
A bad pic, but not a bad sauce.

I will have to try this again, because while the sauce tasted pretty good--buttery & herby-- there were some problems. First, I didn't cool the vinegar mixture long enough (My dinner guests were already here and I was in a hurry), and the heat scrambled the yolks immediately. So, I think my sauce was basically just a seasoned butter, because I noticed all the yolks were cooked at the bottom of the blender. Oh well! Better luck--and more patience--next time!

Photobucket

Nevertheless, after trying two recipes with tarragon and not thinking of only black jelly beans, I am looking forward to trying a few more...I have my eye on Slater's salmon cakes. Until then, I am submitting this post for Weekend Herb Blogging, which is being hosted this week by Anna from Morsels and Musings.


March 4, 2008

Tuesdays with Dorie

So, I've joined a baking/blogging group called Tuesdays with Dorie. Every week, members bake the same recipe from Dorie Greenspan's Baking: From My Home to Yoursthen all post on Tuesdays.

Photobucket

My first recipe was Snickery Squares, a recipe chosen by Erin of Dinner and Dessert. It is a time-intensive but fairly easy recipe that makes a rich dessert bar:

Ingredients

For the Crust:
1 cup all-purpose flour
¼ cup sugar
2 TBSP powdered sugar
¼ tsp salt
1 stick unsalted butter, cut into small pieces and chilled
1 large egg yolk, lightly beaten

For the Filling:
½ cup sugar
3 TBSP water
1 ½ cups salted peanuts
About 1 ½ cups store-bought dulce de leche

(I couldn't find dulce de leche, and didn't plan ahead to make my own, so I used a butterscotch caramel sauce. It tasted good, but was a bit runny [see last photo]. If you can't fine dulce de leche, I'd suggest just making your own.)

For the Topping:
7 ounces bittersweet, coarsely chopped
½ stick unsalted butter, cut into 8 pieces, at room temperature

Directions

  • Preheat oven to 350F. Butter a 8 inch square pan and put it on a baking sheet.
  • To Make the Crust: Toss the flour, sugar, powdered sugar and salt into a food processor and pulse a few times to combine. Toss in the pieces of cold butter and pulse about 12 times, until the mixture looks like coarse meal. Pour the yolk over the ingredients and pulse until the dough forms clumps and curds-stop before the dough comes together in a ball.
Photobucket
  • Turn the dough into the buttered pan and gently press it evenly across the bottom of the pan. Prick the dough with a fork and slide the sheet into the oven.
Photobucket
  • Bake the crust for 15-20 minutes, or until it takes on just a little color around the edges. Transfer the pan to a rack and cool to room temperature before filling.
Photobucket
  • To Make the Filling: Have a parchment or silicone mat-lined baking sheet at the ready, as well as a long-handled wooden spoon and a medium heavy bottomed saucepan.
  • Put the sugar and water in the saucepan and cook over medium-high heat, stirring, until the sugar dissolves. Keeping the heat fairly high, continue to cook the sugar, without stirring, until it just starts to color.
Photobucket
  • Toss the peanuts and immediately start stirring. Keep stirring, to coat the peanuts with sugar. Within a few minutes, they will be covered with sugar and turn white—keep stirring until the sugar turns back into caramel. When the peanuts are coated with a nice deep amber caramel, remove the pan from the heat and turn the nuts out onto the baking sheet., using the wooden spoon to spread them out as best you can. Cool the nuts to room temperature.
Photobucket
  • When they are cool enough to handle, separate the nuts or break them into small pieces. Divide the nuts in half. Keep half of the nuts whole or in biggish pieces for the filling, and finely chop the other half for the topping.
  • Spread the dulce de leche over the shortbread base and sprinkle over the whole candied nuts.
Photobucket
  • To Make the Topping: Melt the chocolate in a heatproof bowl set over a saucepan of barely simmering water. Remove chocolate from the heat and gently stir in the butter, stirring until it is fully blended into the chocolate.
  • Pour the chocolate over the dulce de leche, smoothing it with a long metal icing spatula, then sprinkle over the rest of the peanuts.
Photobucket
  • Slide the pan into the fridge to set the topping, about 20 minutes; if you’d like to serve the squares cold, keep them refrigerated for at least 3 hours before cutting.
Photobucket

Next week, the group is making an apple cake, but since I am planning on only participating every other week, I am going to sit that one out. I am anxious to see what's in store for the week after!

Check out the Tuesdays with Dorie blogroll to see everyone else's Snickery Squares!

Postscript: The crust for this dessert is basically a shortbread...my first attempt at shortbread. It was easier than I expected, so I am planning to make other shortbread soon!