I registered on Twitter so that I could send little updates to my blog. They will be posted in the right column under my blog search box.
Anyone else on Twitter? Let me know so that I can "follow" you.

"One cannot think well, love well, sleep well, if one has not dined well." ~ Virginia Woolf
June 14, 2008
June 13, 2008
Angel Food Cake; or, Cake that Takes a Million Steps to Make

I learned a lot about making angel food cake at work this week...because I made THREE of them on Tuesday...the first angel food cakes I've ever made!
1. There's a heck of a lot of egg separating and sifting goin' on. But, apparently, the sifting is essential to get that light-as-air texture.
2. Cream of Tartar really does help egg whites whip up quickly!
3. Be sure to gently fold the dry ingredients into the whipped egg whites, but be sure to get it all incorporated before pouring the mixture into the cake pan. You don't want pockets of flour hangin' around.
4. Start with a clean kitchen, because all that separating, sifting, and whipping will dirty many bowls!

5. It's important to turn the baked cakes upside-down to cool...that's why angel food cake pans have legs on them. As the cake cools, it will settle. But since it's cooling upside down, the finished cake will still look risen.
6. Never grease the cake pan or use non-stick. You want it to stick to the sides so that it rises properly.
7. Angel food cake is an irresistable and guilt-free sweet treat...it's really all just egg whites!
8. It is particularly good topped with strawberries, bananas, pecans, and a drizzle of Grand Marnier!
9. After making the third cake, it doesn't seem so difficult!
Angel Food Cake
1 3/4 cups superfine (baker's) sugar
1 1/4 cups sifted cake flour (sift before measuring)
1/2 teaspoon salt
1 3/4 cups egg whites (about 12-14 large), at room temperature
1 1/2 teaspoons cream of tartar
1 teaspoon vanilla extract
1/2 teaspoon almond extract
1 1/4 cups sifted cake flour (sift before measuring)
1/2 teaspoon salt
1 3/4 cups egg whites (about 12-14 large), at room temperature
1 1/2 teaspoons cream of tartar
1 teaspoon vanilla extract
1/2 teaspoon almond extract
- Preheat oven to 375. Lower rack in oven and remove higher racks to allow for rising.
- Sift 1/2 cup sugar and cake flour into a medium bowl 3 times.
- Using an electric mixter, beat egg whites and salt until foamy.
- Gradually add remaining 1 1/4 cups sugar, a few tablespoons at a time.
- Add vanilla and almond extracts and beat until soft, droopy peaks.
- Sift sugar/flour mixture over egg whites, 1/4 cup at a time, and gently fold in 10 strokes each addition.
- Transfer batter to ungreased 10-inch angel food cake pan with removable bottom & legs. Cut through batter, lightly, to remove any air bubbles.
- Bake until cake is light golden brown and top springs back when touched, about 35-45 minutes.
- Remove cake from oven & Turn cake pan upside down. Cool cake completely.
- Using a very thin metal spatula or knife, cut around sides and center tube of pan to loosen cake. Push up cake from bottom of pan. Transfer to plate.
Labels:
cakes/cupcakes/muffins,
sweets

June 12, 2008
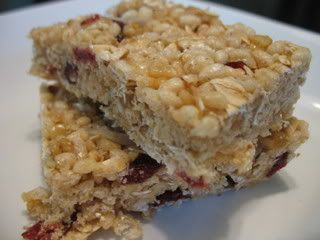
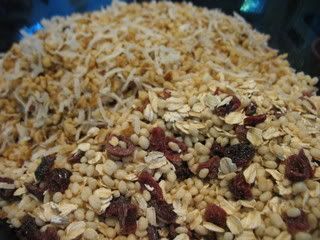
Homemade Power Bars
In her book Super Natural Cooking, Heidi Swanson includes a recipe for "Do-It-Yourself Power Bars." These snacks are made up of rolled oats, toasted walnuts, oat bran, crisp brown rice cereal, dried cranberries, crystallized ginger, and vanilla. On her website 101 Cookbooks, Heidi features another version (along with a snazzy video) called Big Sur Power Bars. These bars are made of pecans, almonds, coconut, oats, cereal, espresso powder, and vanilla. The ingredients in both versions are bound together with brown rice syrup.
My version was a hodge-podge of stuff I already had in the pantry...rolled oats, walnuts, dried cranberries, coconut, and crystallized ginger. I found Brown Rice Crisps and brown rice syrup at Whole Foods.
Heidi's recipes call for unsweetened cereal, but all I could find was lightly sweetened, so I omitted the 1/4 cup of sugar she calls for. I thought the syrup would be sweet enough, especially since the coconut was sweetened as well.
Overall, my bars were tasty...but pretty soft. They held together but were kinda gooey, like soft rice crispy treats. I put the pan in the fridge, and they firmed up enough to cut and carry. Still, they tend to soften quickly if you don't eat them right away. I'm actually curious to know what the texture is supposed to be like.
Anyway...they are GOOD...and a perfect take-along breakfast. I've been munching on the first batch all week and plan to make a second batch, tweaking the ingredients, this weekend.
Here's what I made. I really suggest you try it!
Homemade Power Bars

1 tablespoon butter (or coconut oil).
1 1/4 cups rolled oats (I used the regular "Old Fashioned" Quaker Oats in the round container).
1 1/3 cups walnut chips, toasted.
2 cups brown rice crisps *(see note below).
1 cup dried cranberries.
1 cup coconut, toasted.
3 tablespoons crystallized ginger, finely chopped.
1 cup brown rice syrup.
1 teaspoon vanilla extract.
1/2 teaspoon fine-grain sea salt.
NOTE: As Heidi suggests, be sure to get cereal labeled crisp rather than puffed. If you can't find brown rice cereal, you can use regular Rice Crispies.
- Grease an 8x8 baking pan, or for thinner bars use a 9x13 pan, with butter.
- Toast the nuts and coconut in a non-stick skillet on the stovetop or on a baking sheet in a 350 degree oven for 7 minutes or so...until they are golden and fragrant.
- Mix the oats, nuts, coconut, cereal, cranberries, and ginger in a large bowl.

- Heat the rice syrup in a small saucepan over medium heat, stirring constantly as it comes to a boil and thickens just about...about 4 minutes.
- Pour the syrup over the cereal mixture and stir until it is evenly incorporated.
- Spread into prepared pan, pressing top to even out mixture, and cool to room temperature before cutting into bars.

June 10, 2008
Tart Tutorial
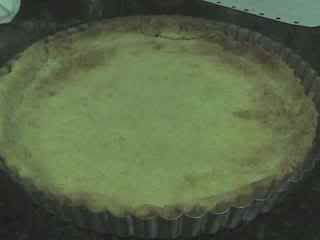
This week's Tuesdays with Dorie recipe, La Palette’s Strawberry Tart, was chosen by Marie of A Year From Oak Cottage. As soon as I saw that it was another tart recipe, I knew I needed to seek help.
You see, I thought the crust on the lemon tart we made in April was too hard. It was my first tart, and I was confused about the dough. Was it supposed to be crumbly? Were you to press it into the pan or roll it out? Why was it so freakin' hard to cut??
So, I took my cookbook to work one day last week to seek help. Anne showed me how to make her recipe for tart dough, a flaky & buttery crust. Soon after that, Dorie herself posted a comment on the TWD website explaining the dough:
Just a quick word on the crust — it can be a bit crisp, especially if you press it down very hard. It’s really a cookie crust, and therefore not at all like softer, flaky pie dough, and it’s meant to be sturdy enough to stand up on its own when you take it out of the tart pan. My suggestions would be to bake it well (it tastes best when it’s well baked because the sugar caramelizes a little) and to make sure to serve it at room temperature. Cut the tart with a serrated knife using a gentle sawing motion and, if it cracks a bit or you get some crumbs, don’t worry about it. This is a dessert that’s rustic in the extreme.
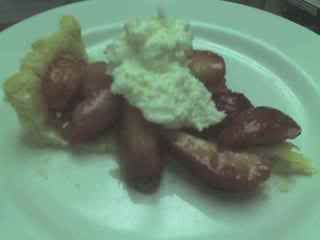
Dorie's strawberry tart is a simple dessert...an "empty" tart shell, cut into wedges, smeared with jam, and topped with berries.
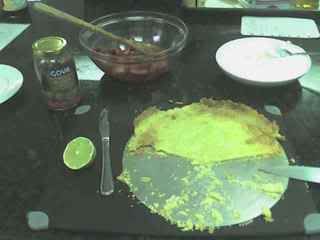
I topped our crust with guava jelly, strawberries with lime zest & juice, and whipped cream. I still thought that the flakier crust worked well. Though, it was very delicate...but oh so buttery!
Disclaimer: Please forgive the horrible pics. All I had was my cell phone that day!
You see, I thought the crust on the lemon tart we made in April was too hard. It was my first tart, and I was confused about the dough. Was it supposed to be crumbly? Were you to press it into the pan or roll it out? Why was it so freakin' hard to cut??
So, I took my cookbook to work one day last week to seek help. Anne showed me how to make her recipe for tart dough, a flaky & buttery crust. Soon after that, Dorie herself posted a comment on the TWD website explaining the dough:
Just a quick word on the crust — it can be a bit crisp, especially if you press it down very hard. It’s really a cookie crust, and therefore not at all like softer, flaky pie dough, and it’s meant to be sturdy enough to stand up on its own when you take it out of the tart pan. My suggestions would be to bake it well (it tastes best when it’s well baked because the sugar caramelizes a little) and to make sure to serve it at room temperature. Cut the tart with a serrated knife using a gentle sawing motion and, if it cracks a bit or you get some crumbs, don’t worry about it. This is a dessert that’s rustic in the extreme.
Dorie's strawberry tart is a simple dessert...an "empty" tart shell, cut into wedges, smeared with jam, and topped with berries.

I topped our crust with guava jelly, strawberries with lime zest & juice, and whipped cream. I still thought that the flakier crust worked well. Though, it was very delicate...but oh so buttery!
Anne's Tart Crust
1 1/4 cups flour
2 Tbs. sugar
1/4 tsp. salt
½ cup butter
1 egg
Cut the butter into the sugar, flour, and salt until crumbly, but do not overmix. Add the egg and bring the dough together until it forms a ball. Refrigerate for at least 30 minutes. On a floured baking mat or parchment, roll out the dough and fit into an 11" tart pan with a removable bottom. Cover with aluminum foil and fill with pie weights. Bake the crust at 375 for 15-20 or until dry.
Let the crust cool before slicing, smearing, & filling. Any combination of jam & fruit would work. In fact, I am seriously considering making another with ginger spread and peaches!
2 Tbs. sugar
1/4 tsp. salt
½ cup butter
1 egg
Cut the butter into the sugar, flour, and salt until crumbly, but do not overmix. Add the egg and bring the dough together until it forms a ball. Refrigerate for at least 30 minutes. On a floured baking mat or parchment, roll out the dough and fit into an 11" tart pan with a removable bottom. Cover with aluminum foil and fill with pie weights. Bake the crust at 375 for 15-20 or until dry.

Let the crust cool before slicing, smearing, & filling. Any combination of jam & fruit would work. In fact, I am seriously considering making another with ginger spread and peaches!

Disclaimer: Please forgive the horrible pics. All I had was my cell phone that day!
Labels:
fruit,
pie/tart,
sweets,
Tuesdays with Dorie
June 8, 2008
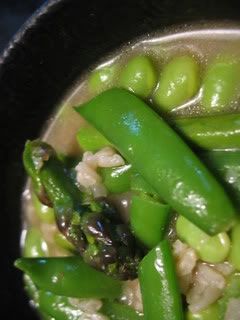
Spring (or Summer) Minestrone
The temperature's been in the 90's. While I don't usually crave soup when the weather's warm, I DO crave fresh, healthy, light foods. And this soup really hit the spot last night.

It's the cover recipe from Super Natural Cooking by Heidi Swanson. You'll be seeing a few more recipes from this book soon, as it's my current favorite.

It's the cover recipe from Super Natural Cooking by Heidi Swanson. You'll be seeing a few more recipes from this book soon, as it's my current favorite.
Spring Minestrone
with Brown Rice
with Brown Rice
2 tablespoons extra-virgin olive oil
2 shallots (or 1 small white onion), thinly sliced
1 clove garlic, minced
3/4 cup medium-grain brown basmati rice, rinsed
6 cups vegetable (or chicken) stock
1 cup sugar snap or snow peas, trimmed and cut in half diagonally
8 asparagus spears, trimmed and sliced diagonally into i-inch pieces
1/2 cup edamame or green peas, fresh or frozen
salt & pepper
You can add any herbs or seasonings you'd like and top this soup with shredded parmesan cheese or a drizzle of toasted sesame oil.
2 shallots (or 1 small white onion), thinly sliced
1 clove garlic, minced
3/4 cup medium-grain brown basmati rice, rinsed
6 cups vegetable (or chicken) stock
1 cup sugar snap or snow peas, trimmed and cut in half diagonally
8 asparagus spears, trimmed and sliced diagonally into i-inch pieces
1/2 cup edamame or green peas, fresh or frozen
salt & pepper
- Heat the oil in a large saucepan over medium-high heat, then add the shallots & garlic and saute for a couple of minutes until soft.
- Add the rice and cook, stirring, for one minute.
- Add the stock and bring to a boil. Cover, lower the heat, & simmer until the rice is just tender, 35-45 minutes.
- Add the sugar snap peas, asparagus, and edamame. Season with salt & pepper. Simmer for 2-3 minutes.
- Serve immediately while the veggies are still crisp and bright.

You can add any herbs or seasonings you'd like and top this soup with shredded parmesan cheese or a drizzle of toasted sesame oil.
Subscribe to:
Posts (Atom)